Step-by-Step Guide to Custom Style
TL;DR:
- Personalizing varsity jackets allows for unique expression and a cohesive personal or group statement.
- Careful planning, including early design approval and vendor coordination, ensures quality and timely delivery.
- Customized gear boosts event participation, group bonding, and fundraising success through emotional connection.
You found the perfect varsity jacket silhouette, but the color is wrong, the logo means nothing to you, and every other person at the event is wearing the same thing. That feeling of settling for “close enough” is exactly why a personalized workflow matters. When you control every element of your jacket, from the material to the lettering style, you stop wearing a product and start wearing a statement. This guide walks you through every stage of the customization process so you can build a varsity jacket that genuinely reflects who you are, whether you’re doing it solo or ordering for an entire crew.
Table of Contents
- What you need: Materials, tools, and inspiration
- Step-by-step workflow for personalizing your varsity jacket
- troubleshooting and avoiding common mistakes
- verifying quality and celebrating results
- Making personalization effortless: What most guides miss
- Ready to create your own varsity jacket?
- frequently asked questions
Key Takeaways
| Point | Details |
|---|---|
| Gather materials smartly | Start your workflow by organizing all jacket materials, tools, and creative inspiration up front. |
| Follow proven steps | A structured customization process minimizes mistakes and keeps your project on schedule. |
| Watch for common pitfalls | Avoid delays and errors by vetting vendors and consolidating group orders for efficiency. |
| Celebrate your unique results | Verifying quality and sharing your custom jacket gives confidence and personal satisfaction. |
| Simplicity boosts satisfaction | Sticking to a few core personalization elements helps keep the workflow enjoyable and results meaningful. |
What you need: Materials, tools, and inspiration
Having set the stage for why personal style matters, let’s start by assembling the foundation for your customization journey. Before you place a single order, you need a clear picture of what goes into a great personalized varsity jacket and where to find the creative fuel to make bold choices.
Understanding jacket materials
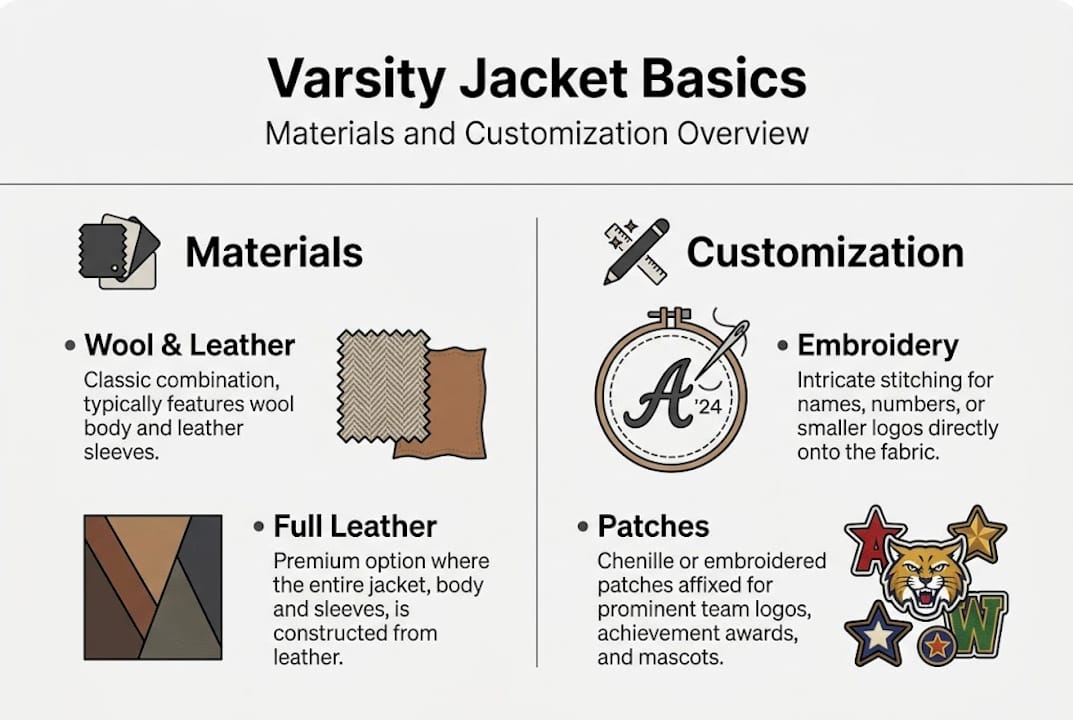
The body material sets the tone for everything else. Here’s a quick breakdown of the three most common options:
| Material | Feel and look | Best for | Price range estimate |
|---|---|---|---|
| wool body / leather sleeves | Classic, structured | Traditional varsity aesthetic | Mid to high end |
| Full leather | Bold, edgy | Statement or motorcycle style | High end |
| synthetic/polyester blend | Light, flexible | Budget builds and group orders | Budget to mid |
Wool body with leather sleeves is the gold standard for that iconic varsity look. Full leather works if you want something that crosses into biker or fashion territory. A synthetic blend keeps costs low, making it smart for team or club orders.
Your customization toolkit
Once you pick a base material, it’s time to think about how you’ll add personality. The main methods are:
- Iron-on or sewn patches: Fast, cost-effective, highly visual
- Custom embroidery: Clean, durable, professional quality
- Screen printing: Great for large graphics across the back panel
- Custom lettering: Name, number, or slogan placement on chest or sleeve
- Color blocking: Two-tone or tri-color combinations on panels
You can explore the full range of jacket personalization options to see which techniques suit your vision best.
Timeline and bulk order facts
Production benchmarks run 2 to 6 weeks, with bulk discounts reaching up to 50% for larger orders. That window accounts for design approval, material sourcing, production, and shipping. Planning ahead by at least six to eight weeks gives you breathing room if revisions pop up.
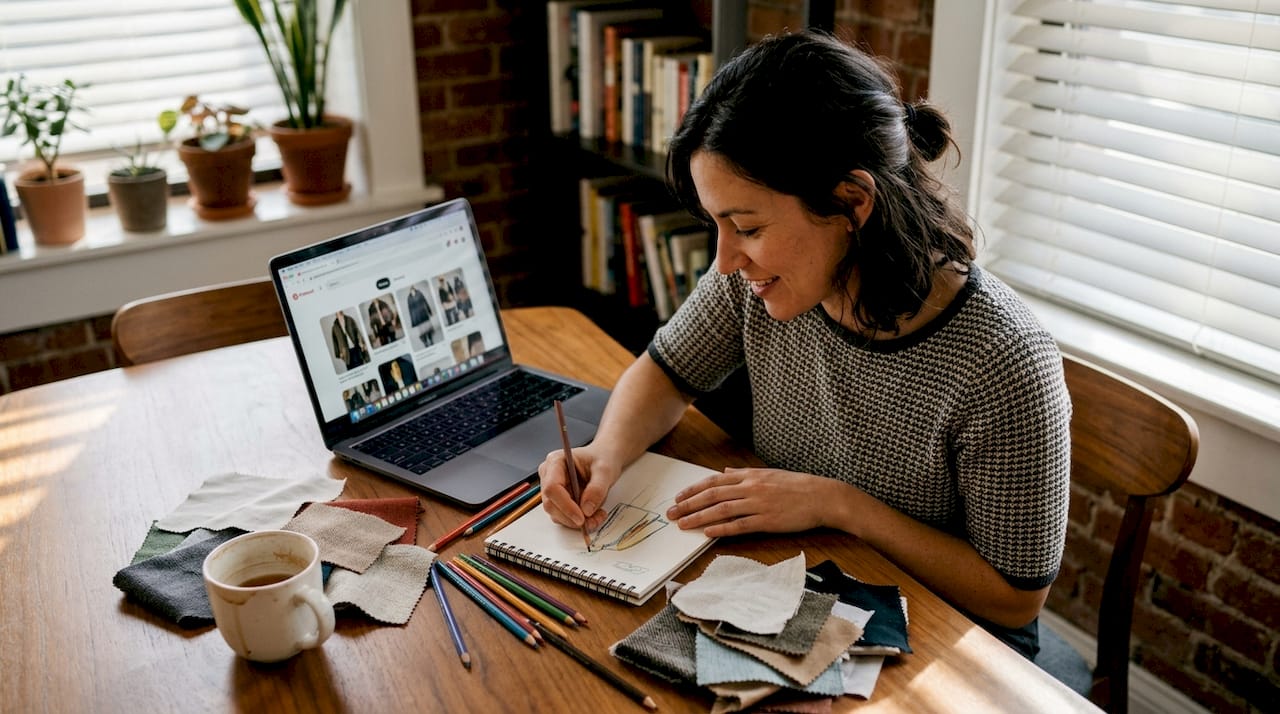
For creative direction, look at what’s trending on platforms like Pinterest and Instagram, then filter by what actually resonates with your personal story. Check out examples of personalized varsity jackets to spark ideas before committing to a direction.
Pro tip: If you’re ordering in bulk for a group, finalize your design before collecting payments. This prevents mid-process changes that can push back production timelines and eat into your bulk savings.
Step-by-step workflow for personalizing your varsity jacket
With your vision, materials, and inspiration gathered, we can now move into the practical workflow to bring your personalized jacket to life. Breaking the process into defined steps keeps it manageable and reduces the risk of costly errors.
Step 1: Define your concept
Write down your core idea in one sentence. Who is this jacket for, what does it represent, and what emotion should it trigger when someone sees it? A tight concept keeps decision-making fast and focused.
Step 2: Choose your features
Refer to the buying guide for varsity jackets and lock in your selections: material, sleeve color, lining color, patch placement, and lettering style. Don’t skip lining color. It’s a small detail that elevates the whole jacket when someone catches a glimpse inside.
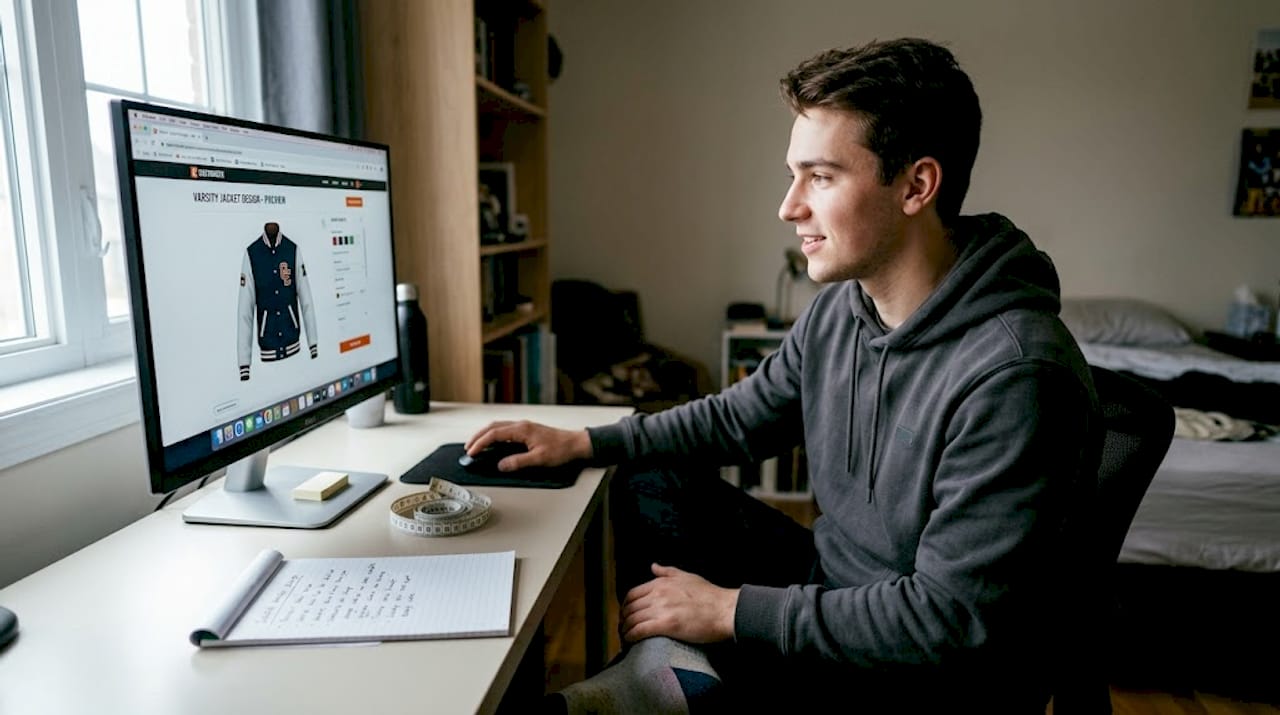
Step 3: Use the online customization tool
Most quality providers offer a real-time design preview. The online jacket customization process lets you visualize your jacket before approving the final file. This is the stage where you catch spacing issues, font mismatches, and color conflicts before they become expensive problems.
Step 4: Submit and confirm
After reviewing your design, confirm all specs in writing with the provider. Document color codes (use PMS or hex values, not generic names like “red”), sizing per person for group orders, and your target delivery date.
Step 5: Track production
Here’s a rough timeline to set expectations:
| Stage | Average duration |
|---|---|
| Design approval | 1 to 3 days |
| Material sourcing | 3 to 7 days |
| Production | 10 to 21 days |
| Quality check | 2 to 3 days |
| shipping | 3 to 7 days |
Studies show custom gear achieves over 2x event attendance when used for group spirit wear programs. That data tells you something powerful: personalized gear builds identity and belonging.
Quality note: Always request a physical sample or a high-resolution digital mockup before full production begins, especially for embroidery details. A minor font or thread color discrepancy at the mockup stage is a five-minute fix. After production, it’s a costly reorder.
For intricate embroidery specifically, the custom embroidery jackets guide breaks down thread counts, stitch styles, and complexity pricing so you go in with realistic expectations.
Pro tip: Run your design preview past at least two other people before approving. Fresh eyes catch layout issues you’ve gone blind to after staring at it for hours.
troubleshooting and avoiding common mistakes
Now that you know the workflow, it’s equally important to anticipate potential challenges and learn to sidestep common problems. Most customization headaches are predictable and completely avoidable with the right habits.
Common mistakes and how to avoid them
- Wrong sizing: Always use the provider’s size chart, not a generic one. Request measurements in inches, not just S/M/L labels, which vary wildly between manufacturers.
- Color drift: Digital screens show colors differently than physical materials. Always confirm colors using PMS codes or physical swatches before approving.
- Design overload: Too many elements crowd the jacket and dilute the impact. Pick a focal point and build around it.
- Late-stage changes: Changes after production begins can reset your entire timeline. Lock your design before you submit.
- Multiple vendors for one order: 72% of buyers use multiple vendors, creating coordination issues that delay delivery and create inconsistent quality across an order.
For practical strategies to avoid these traps, the personalization tips resource covers common failures and their fixes in detail.
Managing group orders
Group orders add a layer of complexity because you’re coordinating multiple sizes, names, and preferences. Create a shared spreadsheet with every member’s name, size, and any personal customization notes. Set a hard deadline for submissions, at least two weeks before your actual order date, to allow for errors and revisions.
Group order wisdom: One person should own the final approval process. When everyone has equal say, decisions stall. A single point of contact speeds up communication and keeps production on track.
Look at unique varsity jacket examples for inspiration on how successful group orders balance unified themes with individual touches.
Pro tip: If you’re ordering for a team or club, consolidate everything into one vendor and one order. A single relationship is easier to manage, and it unlocks deeper bulk discounts than splitting across two suppliers.
verifying quality and celebrating results
After completing your customized jacket, it’s time to evaluate its quality and enjoy the social and personal benefits it offers. Don’t skip the verification step. A thorough check now prevents regret later.
Your quality checklist
- Check embroidery and patch alignment: Hold the jacket flat on a table. Look at symmetry from arm to arm and from chest to back panel.
- Test all seams and construction: Run your fingers along every seam. No loose threads, no puckering, no gaps at the sleeve connection.
- Compare against your approved mockup: Open your original design file and compare it side by side with the finished product. Colors, fonts, and placement should match.
- Try it on: Check mobility, comfort at the shoulders, and sleeve length. It should move with you, not against you.
- Test the zipper and snaps: These get the most repeated use. A sticky zipper or loose snap is a warranty issue, report it immediately.
The real-world impact of personalized gear
87% of organizations use custom gear for fundraising, and those programs consistently outperform traditional fundraising methods. That’s not just a school statistic. It reflects something universal: personalized gear creates emotional connection that generic products simply don’t.
| Key result | Impact with custom gear |
|---|---|
| Event attendance | More than 2x higher |
| Group fundraising success | outperforms traditional methods |
| Individual identity expression | Much stronger with personalized gear |
Your jacket becomes a wearable story. Whether you use it to rep your college, your crew, a sports team, or just your own aesthetic, it communicates something before you say a word. For ideas on how teams maximize this effect, the team jacket design resource offers real-world layouts and ordering strategies. And if you want to understand the broader benefits beyond style, check the breakdown of the advantages of varsity jackets for students and young adults.
Making personalization effortless: What most guides miss
Most customization guides hand you a long list of options and leave you to sort through the noise alone. We’ve seen it repeatedly: the more choices presented upfront, the more paralyzed buyers become. They spend hours debating sleeve colors when the core design concept was never fully thought through.
Here’s what actually works. Start with one anchor element. Maybe it’s a specific patch that represents something real to you. Maybe it’s a two-letter monogram in a font you love. Build everything else around that anchor. The jacket becomes cohesive because it has a center of gravity.
Expert insight: The best personalized jackets aren’t the ones with the most customization. They’re the ones where every element serves the same story.
Trend-chasing is the fastest way to create a jacket you’ll be embarrassed by in two years. The clear customization overview we recommend consistently reinforces one principle: personal narrative beats trend relevance every time.
Pro tip: Write your jacket’s story in three words before designing it. Those three words become your filter. If a design element doesn’t match them, cut it.
Ready to create your own varsity jacket?
You now have a full workflow, a troubleshooting playbook, and a fresh perspective on what makes personalization actually work. The next step is putting it into motion.
At order custom varsity jacket, you can start your design with real-time previews, expert support, and worldwide free shipping. We walk you through every stage of the unique customization journey so nothing gets lost in translation between your vision and the finished product. Not sure where to start? Browse jacket styles for personal flair to find the base that fits your identity, then build from there. Your jacket. Your story. Let’s make it real.
frequently asked questions
How long does the varsity jacket personalization process take?
Most custom varsity jacket workflows take 2 to 6 weeks from design approval to delivery, depending on order size and the complexity of your customization choices.
What customization options can I choose for my varsity jacket?
Typical options include embroidery, iron-on or sewn patches, color selection, personalized text, screen printing, and unique material combinations like wool body with leather sleeves.
Can I personalize jackets for a group or team?
Absolutely. Group orders are common for sports teams and clubs, and bulk discounts reach 50% for larger orders, making group customization both practical and cost-effective.
What’s the impact of personalized jackets on school events and fundraising?
Schools with recurring spirit wear programs see more than 2x event attendance and outperform traditional fundraising methods when using custom gear consistently.
How do I avoid delays or mistakes with my custom varsity jacket?
Work with a single reliable vendor, approve a digital mockup before production, and consolidate group orders into one submission to eliminate coordination issues and reduce costly errors.
Recommended
- Step-by-step jacket customization guide for unique style
- Create Stylish Custom Embroidery Jackets: Step-by-Step Guide – Maker of Jacket
- Step-by-Step Guide to Picking Jacket Styles for You – Maker of Jacket
- Step-by-Step Process for Customizing Jacket Online – Maker of Jacket
- Custom T-Shirt Printing Guide: Local Solutions for Teams
