How to Measure for Motorcycle Suits: Step-by-Step Guide

TL;DR:
- Accurate measurements are essential for a motorcycle suit that fits properly and provides safety.
- Proper measurement tools, techniques, and verification prevent costly errors and ensure comfort.
- Customized suits built on precise measurements offer optimal protection, performance, and riding experience.
A motorcycle suit that fits poorly is more than uncomfortable. It shifts armor out of position, restricts movement at critical moments, and can turn a confident ride into a distracted, frustrating experience. Whether you’re ordering your first custom suit or replacing gear you’ve outgrown, accurate measurements are the single most important step you’ll take before placing an order. This guide walks you through every tool you need, every measurement that matters, and every mistake worth avoiding so your next suit fits like it was built for you because it was.
Table of Contents
- Essential tools and preparation checklist
- Step-by-step guide to measuring your body
- Verifying accuracy and double-checking common mistakes
- Applying your measurements for the perfect suit fit
- What most riders miss about measuring for motorcycle suits
- Get your custom motorcycle suit with a perfect fit
- Frequently asked questions
Key Takeaways
| Point | Details |
|---|---|
| Preparation is key | Accurate measurements start with the right tools, clothing, and environment. |
| Follow each step | Carefully measuring each body part ensures your suit will fit and protect you as designed. |
| Double-check work | Verifying your measurements helps you avoid costly sizing errors with custom orders. |
| Use charts correctly | Match your measurements to sizing charts or order forms for an ideal, comfortable fit. |
Essential tools and preparation checklist
Getting your measurements right starts long before you pick up a tape measure. The preparation phase sets the foundation for every number you record, and skipping it is one of the most common reasons riders end up with gear that doesn’t fit.
Here’s what you need before you start:
- Flexible fabric tape measure (not a rigid metal one)
- Pen and paper or a notes app on your phone
- A helper if possible, especially for back and shoulder measurements
- Tight-fitting base layer such as a compression shirt and leggings
- A full-length mirror in a well-lit room
- Flat, hard floor surface for height measurement
The workspace matters more than most riders realize. A dim room makes it hard to read the tape accurately, and a cluttered space limits your ability to stand naturally. Set up in a space where you can move freely and see yourself clearly.
Why does the base layer matter so much? Because measuring tape accuracy depends on tight-fitting base layers that reflect your true body shape, not the shape of your clothing. Baggy jeans or a thick hoodie can add two to four inches to your measurements without you noticing. That kind of error turns a custom suit into an oversized one.
| Tool | Why it matters |
|---|---|
| Fabric tape measure | Conforms to body curves for accurate readings |
| Base layer clothing | Eliminates fabric bulk from measurements |
| Helper | Reduces measurement angle errors |
| Mirror | Confirms tape is level and correctly positioned |
| Notes app or paper | Prevents misremembering numbers between steps |
Refer to the jacket sizing chart at Maker of Jacket to understand which measurements map to which size ranges before you begin. Knowing the chart in advance helps you understand which numbers are most critical for your body type.
Pro Tip: Ask your helper to read the tape while you stand naturally. When you try to read it yourself, you often tilt your head or shift your posture, which changes the number by a surprising amount.
Step-by-step guide to measuring your body
With your tools ready, now it’s time to take each measurement with care. Rushing this process is the single biggest mistake riders make. A 10-minute session done right saves you weeks of returns and alterations.
Follow these steps in order:
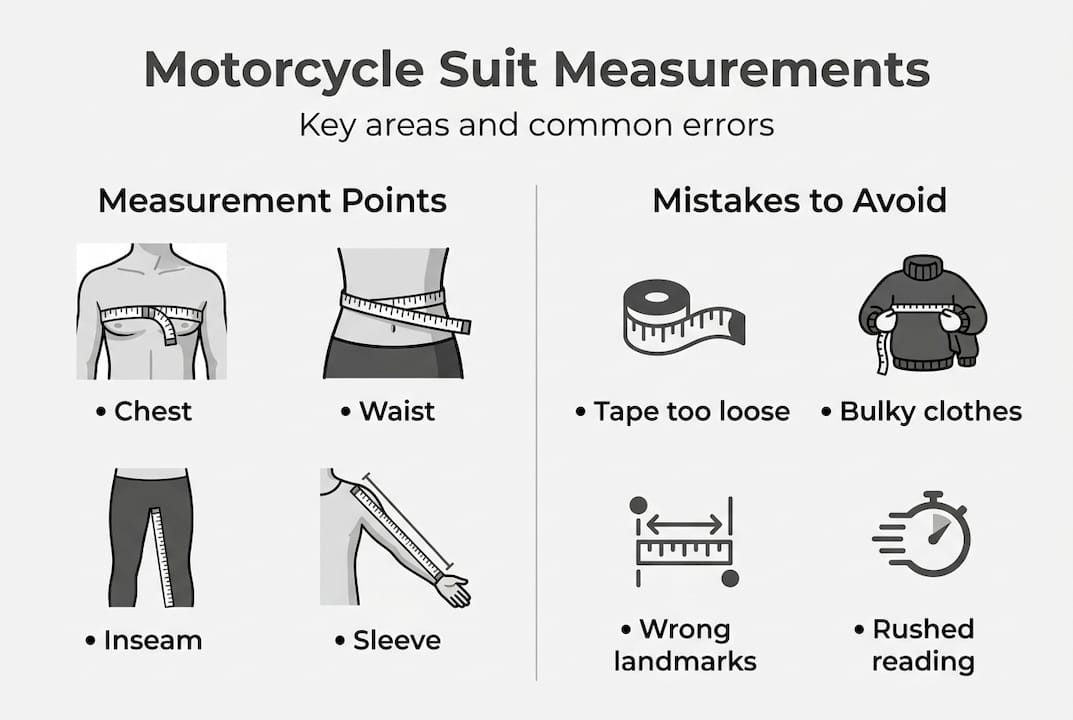
- Chest: Wrap the tape around the fullest part of your chest, just under your armpits. Keep it parallel to the floor. Breathe normally, don’t puff out or suck in.
- Waist: Measure around your natural waist, which sits just above your hip bones. Keep the tape snug but not compressing the skin.
- Hips: Measure around the fullest part of your hips and seat, usually about 8 inches below the natural waist.
- Inseam: Stand with feet shoulder-width apart. Measure from the crotch seam down to the floor along the inside of your leg.
- Sleeve length: Start at the center back of your neck, go across the shoulder, and down to your wrist with a slight bend in the elbow.
- Shoulder width: Measure straight across your back from one shoulder point to the other.
- Height: Stand against a flat wall without shoes. Mark the top of your head and measure from the floor to that mark.
As noted in the motorcycle jacket sizing guide, specific measurement points are essential for a tailored motorcycle fit because each zone of the suit corresponds to a different protective panel or articulation point.

| Measurement | Key landmark | Common mistake |
|---|---|---|
| Chest | Fullest point, under arms | Measuring too high or low |
| Waist | Above hip bones | Measuring at the belly button |
| Inseam | Crotch to floor | Standing with feet too wide |
| Sleeve | Neck center to wrist | Arm fully extended, not bent |
| Shoulder | Shoulder point to point | Tape sagging across the back |
For more context on how these numbers influence your gear’s construction, the motorcycle suit design essentials guide explains how each panel is engineered around specific body zones.
Pro Tip: Take every measurement twice and record both numbers. If they match, you’re good. If they differ by more than half an inch, take a third measurement and use the middle value.
Verifying accuracy and double-checking common mistakes
After taking your measurements, it’s time to ensure your numbers are spot on. This step is where most riders lose focus, assuming that one round of measuring is enough. It rarely is.
Here’s how to verify your results effectively:
- Repeat each measurement at least once, ideally on a different day or after a short break
- Compare your numbers against the manufacturer’s size chart to see if they fall within a logical range
- Ask your helper to re-measure two or three key points independently without seeing your original numbers
- Cross-reference height and weight as a sanity check since most size charts use both
As highlighted in the motorcycle jacket fitting workflow guide, retaking and cross-verifying measurements can prevent costly custom suit errors that are difficult or impossible to fix after production.
| Correct approach | Incorrect approach |
|---|---|
| Tape parallel to floor | Tape angled up or down |
| Relaxed, natural posture | Slouching or standing rigid |
| Tight base layer only | Measuring over jeans or a jacket |
| Two measurements per point | One rushed measurement per point |
| Helper reads the tape | Self-reading with head tilted |
Safety note: A suit that fits too loosely allows armor panels to shift away from your joints and spine during a crash. A suit that fits too tightly restricts the movement needed to control your bike and can cause fatigue on long rides. Neither extreme is acceptable when your safety is on the line.
The most frequent mistakes riders make during this stage include letting the tape go slack between measurements, skipping the inseam entirely because it feels awkward, and rounding numbers up or down to the nearest whole inch. Every fraction counts when you’re ordering a custom suit.
Applying your measurements for the perfect suit fit
Once your measurements are verified, you’re ready to find your perfect fit. This is where numbers become decisions, and the choices you make here directly affect how your suit performs on the road.
Here’s how to use your measurements effectively:
- Locate the manufacturer’s size chart and find the column that matches your largest measurement first
- Check every measurement against that size to confirm it falls within range, not just one or two
- Note which measurements fall closest to the upper boundary of a size, as those are your tightest points
- For custom suits, enter each measurement exactly as recorded without adjusting for what you think sounds right
- For off-the-rack suits, identify which size accommodates your chest and shoulder measurements since those are the hardest to alter
Matching measurements to manufacturer size charts ensures optimal suit fit and prevents the common error of defaulting to a size based on your shirt or pants size alone. Motorcycle suit sizing is completely different from everyday clothing.
When you’re between sizes, context matters. If you plan to wear a thermal underlayer in winter, size up. If you ride in warm weather with minimal layers, the smaller size will give you a cleaner, more protective fit. The guide on choosing a motorcycle jacket covers this decision in practical detail.
Custom suits offer a major advantage here. Instead of compromising on one measurement to accommodate another, every panel is cut to your exact numbers. The motorcycle suit advantages are most visible when the suit is built around your body rather than a standard template.
Pro Tip: If your chest and waist measurements point to different sizes, prioritize the chest for the upper suit and the hips or inseam for the lower. Most custom suit makers allow you to specify this split, so always ask.
What most riders miss about measuring for motorcycle suits
Most measuring guides treat this process as a box to check before ordering. Record your numbers, match them to a chart, done. But that framing misses the bigger picture entirely.
Accurate measurement isn’t just about getting the right size. It’s the moment you decide to take your riding experience seriously. A suit built to your exact dimensions keeps every armor panel exactly where it belongs, every time. That consistency is what makes protection reliable rather than occasional.
We’ve seen riders spend thousands on premium suits and then rush through a five-minute measuring session with a metal tape over a thick sweatshirt. The suit arrives, the fit is off, and they blame the brand. The real issue started before the order was placed.
The motorcycle suit design guide makes it clear that every design decision in a quality suit assumes accurate input measurements. When those numbers are wrong, even the best construction can’t compensate.
Ten focused minutes of measuring, done correctly, can transform how a suit performs for years. That’s not an exaggeration. It’s the most high-return investment in your riding comfort and safety that costs you nothing but attention.
Get your custom motorcycle suit with a perfect fit
You’ve done the work. You have accurate measurements, you understand how to apply them, and you know what to avoid. Now it’s time to put those numbers to use.

At Maker of Jacket, we build motorcycle suits around your exact measurements, not a generic template. Every panel, every seam, and every armor pocket is positioned based on the numbers you provide. When you customize your jacket or order a custom jacket, you’re not just picking a style. You’re investing in gear that fits the way protective gear should. Explore our customization journey to see how we turn your measurements into a suit that rides with you, not against you.
Frequently asked questions
What measurements do I need for a motorcycle suit?
You need chest, waist, and inseam as the core measurements, plus hips, sleeve length, shoulder width, and height for a complete and accurate fit.
Should I wear clothes when measuring for a motorcycle suit?
Wear tight-fitting base layers only, such as a compression shirt and leggings, to ensure your measurements reflect your actual body shape without added bulk.
How do I choose between two sizes if my measurements are in between?
Sizing up is best for comfort when your measurement falls between standard sizes, especially if you plan to wear armor inserts or thermal layers underneath.
Can I measure myself or do I need help?
You can measure yourself, but getting help with key measurements like shoulder width and sleeve length significantly improves accuracy and reduces the chance of reading errors.
Why does proper measurement matter for motorcycle safety?
Proper fit keeps armor correctly positioned over your joints and spine, ensuring maximum crash protection and preventing dangerous distractions caused by shifting gear during a ride.
Recommended
- Motorcycle suit design guide: style meets safety in 2026
- Motorcycle Jacket Sizing Guide for Perfect Fit and Comfort – Maker of Jacket
- Master the Motorcycle Jacket Fitting Workflow for Perfect Fit – Maker of Jacket
- 7 Types of Motorcycle Suits for Every Rider – Maker of Jacket
- The Ultimate Robe Size Guide 2025: Choosing the Perfect Fit – Lotus Linen
