How to Clean a Varsity Jacket With Leather Sleeves
Varsity jackets are built to last, but only if you take proper care of them. The problem is, most people do not realize that a varsity jacket with leather sleeves is not a single-material garment. It is two completely different materials sewn together, and each one needs its own cleaning approach.
The wool or fabric body and the leather sleeves react to water, heat, and cleaning products in opposite ways. Wool shrinks and pills under heat and agitation. Leather dries out, stiffens, and cracks when exposed to harsh detergents or too much moisture. If you treat them the same way, you risk ruining both at once.
That is exactly why you cannot just throw this jacket in the washing machine and call it a day. You need a method that respects each material separately. Whether your jacket is a school keepsake or a streetwear piece, this guide gives you a clear, step-by-step process to clean it safely at home, without shrinking the body, cracking the sleeves, or fading the colors.
Why This Jacket Needs a Different Approach
Most clothing can handle a standard machine wash. Your varsity jacket cannot. Wool absorbs water and shrinks under heat. It also feels and pills when agitated. Leather, on the other hand, loses its natural oils when it comes in contact with harsh detergents or excessive moisture. Once leather dries out, it stiffens. Left untreated, it cracks, and that damage is often permanent.
Because the body and sleeves need completely different treatments, the only safe method is to handle each section separately. There is no shortcut here. But once you understand the logic behind each step, the process of cleaning varsity jacket leather sleeves and body becomes straightforward.
Understand Your Jacket’s Materials Before You Start
 Before you reach for any cleaning product, take a minute to identify what your jacket is actually made of. This step alone saves you from making costly mistakes.
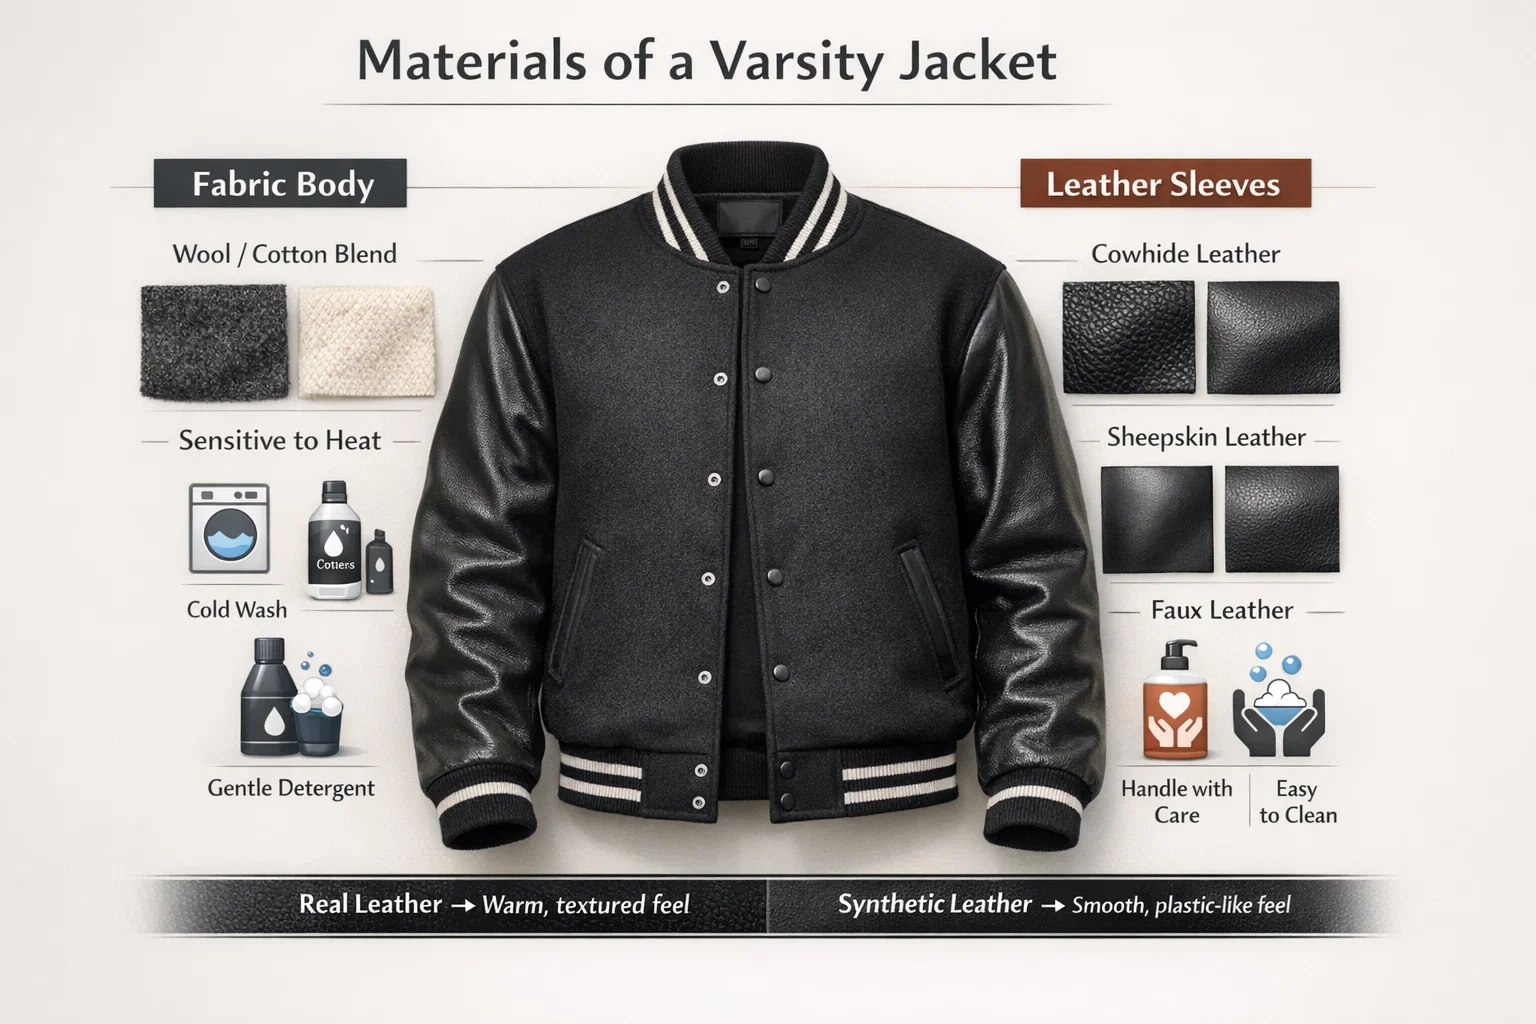
The Fabric Body
Most varsity jackets use a wool or cotton-blend body. Wool is warm and durable, but it is highly sensitive to heat, excess moisture, and friction. Cotton blends are slightly more forgiving, but they still need gentle care. Either way, cold water and mild detergent are your safest options.
The Leather Sleeves
This is where it gets specific. Leather sleeves come in three main types, and each one behaves differently:
- Cowhide leather: The most common type. Durable and long-lasting, but it needs regular conditioning to stay supple.
- Sheepskin leather: Softer and more delicate than cowhide. It requires extra gentleness during cleaning.
- Synthetic or faux/vinyl leather: This material does not absorb conditioner the way genuine leather does. You clean it with mild soap and water; no leather conditioner is needed.
If you are unsure which type you have, check the care label or look up the brand’s product page. Real leather feels warm and slightly textured. Synthetic leather feels uniform and slightly plastic-like.
The Interior Lining
Most people forget about the lining completely. The inner polyester or satin layer absorbs sweat and holds odors over time. You need to address it separately during cleaning, especially if the jacket has been worn regularly.
Pre-Cleaning: What to Do Before You Touch Any Product
A proper pre-cleaning routine prevents small problems from getting worse. Before you apply anything to the jacket, go through this checklist:
- Read the care label first. If it says dry clean only, that instruction is there to protect both materials. Do not ignore it.
- Inspect the jacket under good lighting. Look for stains, cracked leather, loose stitching, and peeling near the seams. Address any repairs before cleaning.
- Remove patches, pins, and accessories. These can snag fabric or scratch leather during the process.
- Empty all pockets and button or zip the jacket fully. This helps it hold its shape throughout cleaning.
- Shake off loose dirt. A gentle shake dislodges dust before any wet cleaning begins.
- Spot-test every new product. Apply a small amount on a hidden area first. Some cleaners can cause discoloration, especially on colored leather.
This ten-minute preparation step protects your jacket and makes the actual cleaning far more effective.
What You Need: Cleaning Supplies and Tools
You do not need a shelf full of products. Here is what actually works:
For the Fabric Body
- A mild, wool-safe detergent such as Woolite
- A soft-bristled brush or lint brush
- Clean microfiber cloths
- Cold water
- A handheld fabric steamer (optional, but useful for refreshing wool)
For the Leather Sleeves
- A pH-neutral leather cleaner such as Lexol or Chamberlain’s Leather Milk
- A quality leather conditioner, such as Bick 4 or Leather Honey
- Distilled water
- Soft microfiber cloths
What to Avoid
Stay away from bleach, alcohol-based sprays, ammonia, and regular household cleaners. These strip the natural oils from leather and break down wool fibers. They might remove a stain on the surface but leave lasting damage underneath.
How to Clean a Varsity Jacket with Leather Sleeves: Step by Step
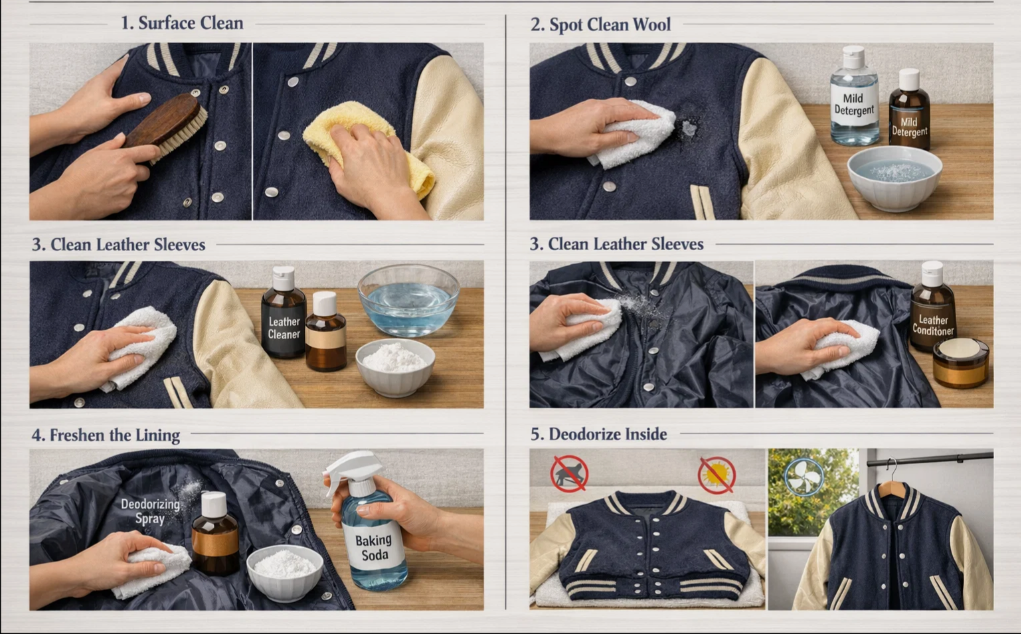 Step 1: Remove Surface Dirt First
Start dry. Use a soft brush to sweep the fabric body downward, always with the grain of the fibers, never against it. For the leather sleeves, wipe them down with a dry microfiber cloth. This removes dust and surface grime before any moisture touches the jacket. Skipping this step means you will work dirt deeper into the material once you start cleaning.
Step 2: Spot Clean the Wool or Fabric Body
The wool body cannot be soaked or machine-washed. Spot cleaning is the standard method, and it works well when done correctly.
Mix cold water with a small amount of mild, wool-safe detergent. Dip a microfiber cloth into the solution, wring it out well, and gently dab the stained area in circular motions. Do not rub; rubbing pushes the stain deeper and damages fibers. Once the stain lifts, use a second cloth dampened with plain cold water to remove soap residue. Blot the area dry with a clean towel.
For tougher stains, a diluted white vinegar solution, one part vinegar to eight parts water, can work, but always spot-test first. If your care label allows handwashing, submerge only the fabric body in cold water with a wool-safe detergent, keeping the leather sleeves completely dry. Gently agitate, rinse thoroughly, press out excess water without wringing, and lay the jacket flat to dry.
Step 3: Clean the Leather Sleeves
Leather requires a completely different approach. The goal is to clean the surface without saturating the material or stripping its natural oils.
Apply your leather cleaner to a soft cloth; never apply it directly to the sleeve. Wipe the leather in gentle, even strokes and pay more attention to areas where oil or dirt is visible. Take a separate cloth lightly dampened with distilled water to wipe away any cleaner residue. Pat the sleeves dry with a clean towel and let them air dry naturally. Never use a blow dryer or set it near a heat source.
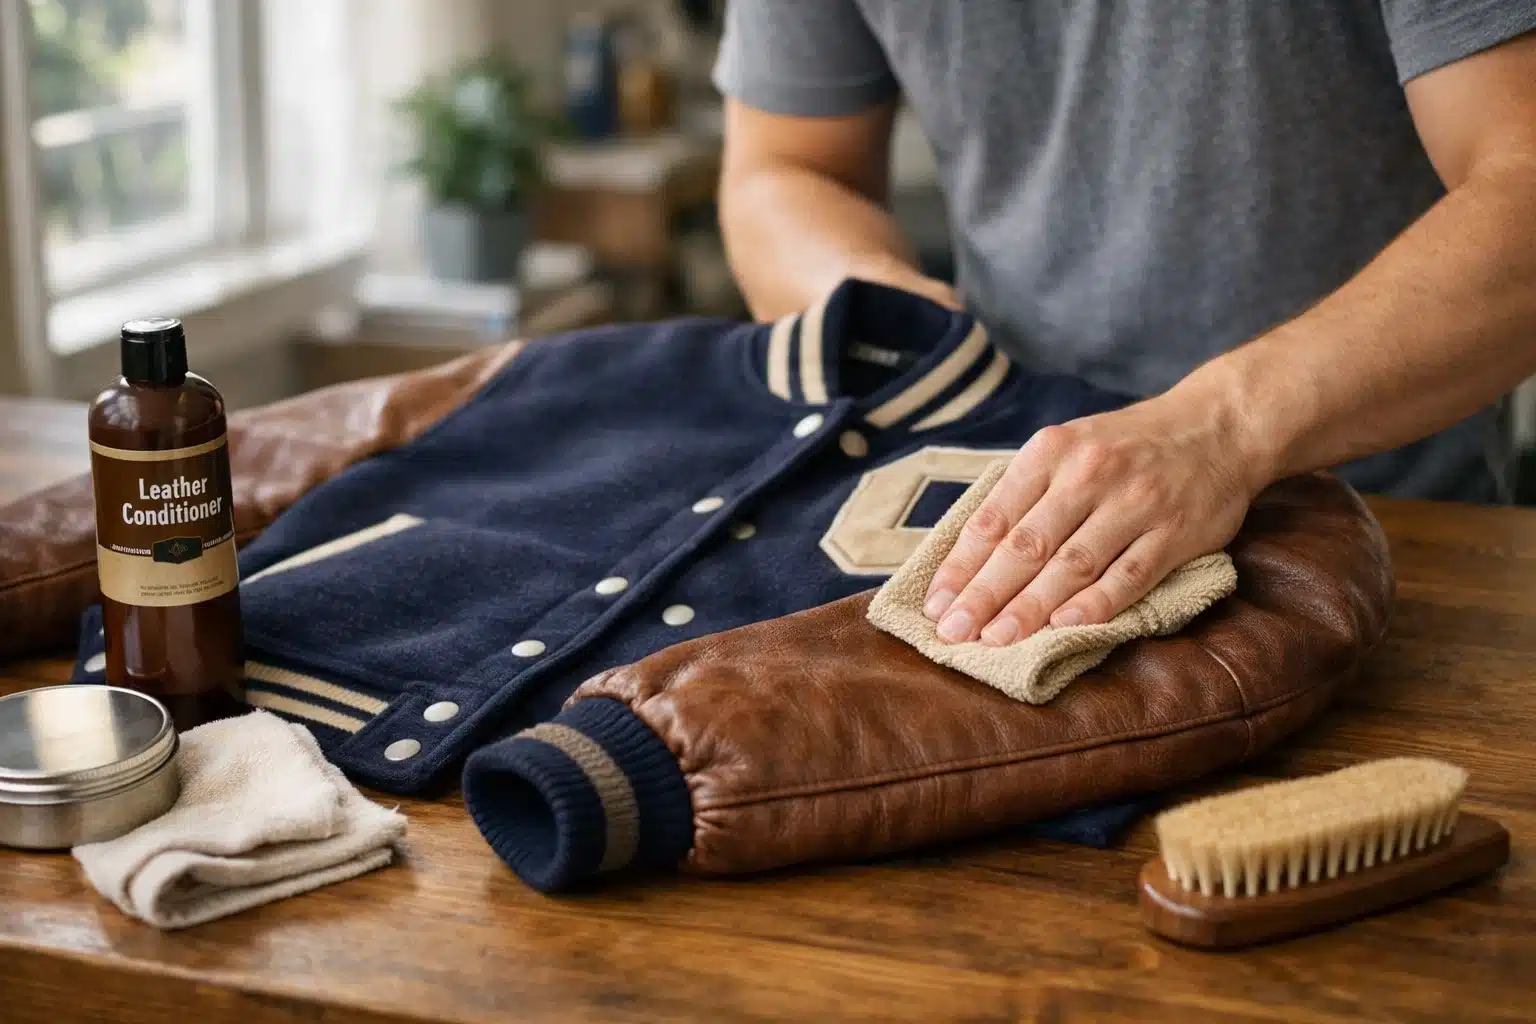
Once the leather is fully dry, apply a thin, even layer of leather conditioner using a soft cloth. Let it absorb for a few hours, then buff gently with a clean cloth. This step is not optional. Conditioning after cleaning is what keeps leather soft, flexible, and crack-free over time.
If your jacket has vinyl or faux leather sleeves, skip the conditioner entirely. Instead, clean them with a mild dish soap solution, four tablespoons in a bowl of warm water, using a soft-bristled brush. Rinse with a clean, damp cloth and dry gently.
Step 4: Clean the Interior Lining
Turn the jacket inside out. Lightly mist the lining with a fabric-safe deodorizing spray, or mix equal parts water and white vinegar in a spray bottle for a natural option. For surface grime on the inner lining, a moist baby wipe works well and is gentle enough to use regularly. Do not soak the lining; you just need to freshen it. Allow it to air out completely before wearing or storing.
Step 5: Get Rid of Odors Without Full Washing
You do not need a full cleaning session every time your jacket smells stale. For light odors, sprinkle baking soda over the fabric interior, leave it overnight, and brush it off the next morning. Baking soda absorbs odors naturally without any moisture touching the leather.
For stronger smells, hang the jacket in a shaded, well-ventilated spot for 24 to 48 hours. If the odor is persistent, especially on thrift store finds, seal the jacket in a plastic bag and place it in the freezer overnight. The cold kills odor-causing bacteria without any water or product touching the jacket.
Step 6: Dry the Jacket the Right Way
After any wet cleaning, lay the jacket flat on a clean, dry towel in a cool, shaded, well-ventilated area. Once it is semi-dry, transfer it to a wide padded hanger, never a thin wire hanger, which stretches the shoulder seams. While the jacket is still slightly damp, gently reshape the collar, cuffs, and shoulders with your hands.
Allow 12 to 24 hours for full air drying, depending on humidity. Keep it away from tumble dryers, radiators, direct sunlight, and any heat source. Heat dries out leather and shrinks wool — two problems that are very difficult to fix after the fact.
How to Remove Stubborn Stains from Leather Sleeves
General cleaning handles most surface dirt, but specific stains need specific solutions.
Oil or Grease Stains
Sprinkle a generous amount of cornstarch or baking soda directly over the stain. Let it sit overnight to absorb the oil. The next morning, brush it off gently with a soft cloth. Do not rub it in. Repeat if needed before reaching for any liquid cleaner.
Ink Stains
Dip a cotton swab lightly in rubbing alcohol and dab the stain carefully. Work from the outer edge inward so you do not spread it. Always test on a hidden area first, as alcohol can affect the dye on leather. Follow up with a leather conditioner once the stain is removed.
Water Stains
The fix for a water stain is more water and a controlled application. Lightly dampen the leather surrounding the stain to blend the waterline, then let the entire sleeve dry evenly. This creates a uniform finish instead of a visible ring.
Common Mistakes That Damage Varsity Jackets
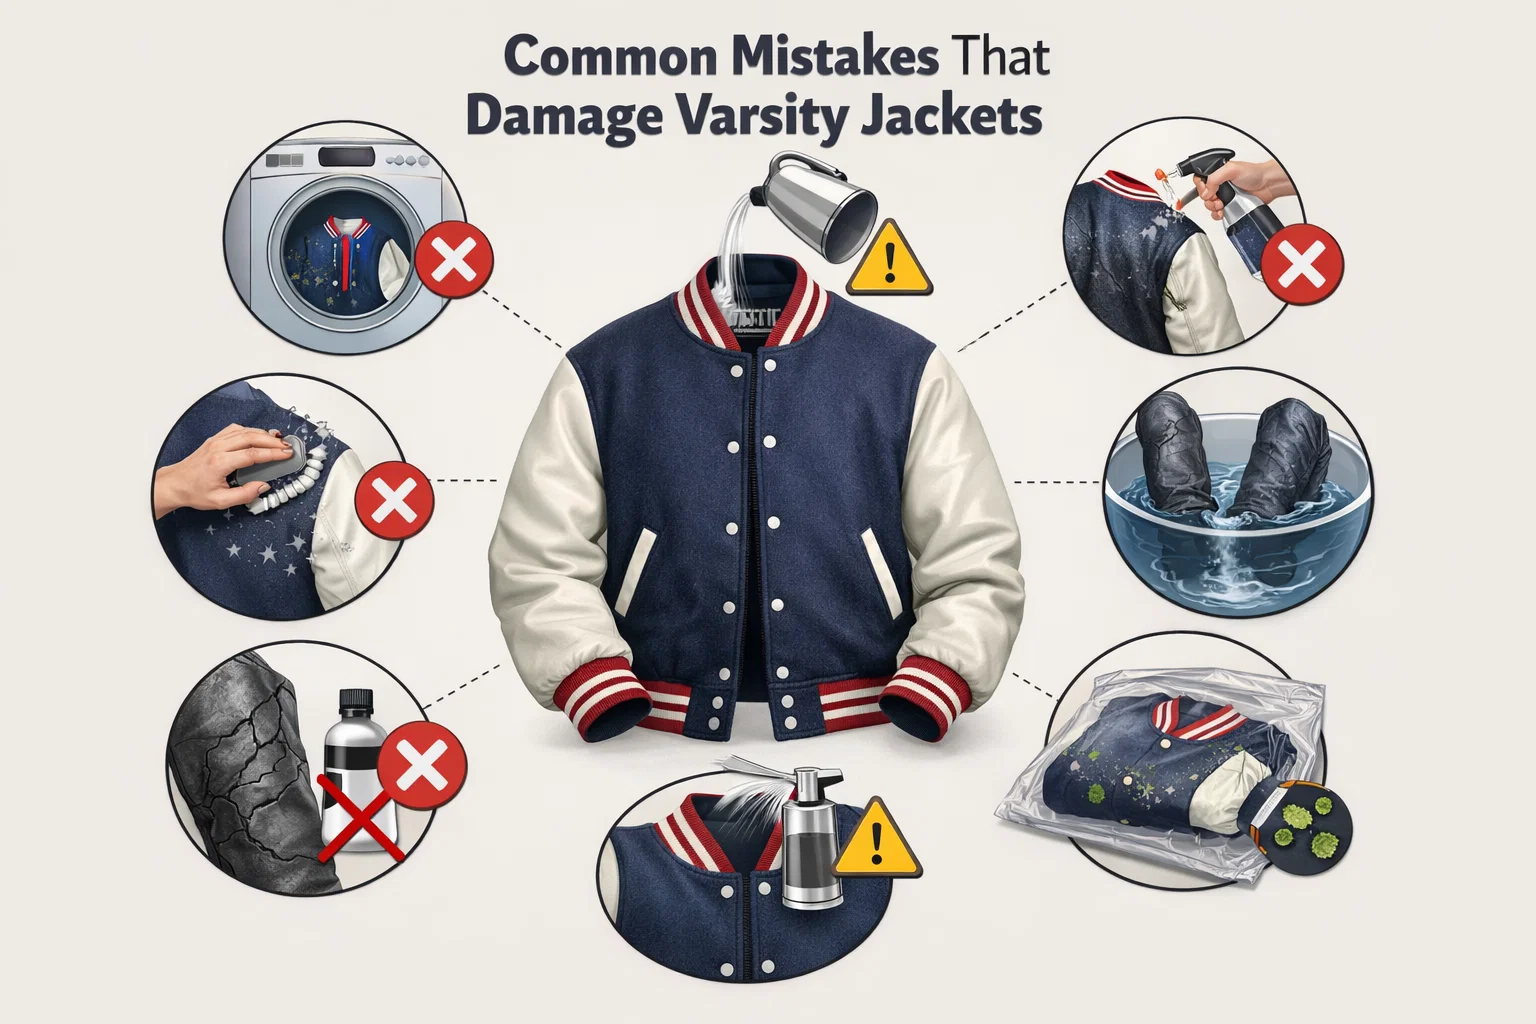 Most jackets do not wear out; they get ruined through improper cleaning. Here are the most common mistakes to avoid:
- Machine washing: The agitation, heat, and detergent combination shrink wool and ccrackleather at the same time.
- Using hot water: Cold water only, always. Hot water causes both fabric shrinkage and leather damage.
- Applying cleaner directly to leather: Always apply it to the cloth first, not the jacket surface.
- Scrubbing instead of dabbing: Aggressive scrubbing causes pilling on wool and surface scratches on leather.
- Soaking the leather sleeves: Even a brief soak can stiffen the leather and cause permanent warping.
- Skipping leather conditioning: Cleaning removes oils from leather. Without conditioning after cleaning, cracks develop within months.
- Storing in a plastic bag or folded: Plastic traps moisture and causes mildew. Folding creates permanent creases in leather.
- Applying perfume or cologne directly to the jacket: Alcohol in fragrances strips leather and can stain the fabric’s body.
Every one of these mistakes in leather sleeve varsity jacket cleaning is easy to avoid once you understand why the cleaning method works the way it does.
How Often Should You Clean Your Varsity Jacket?
Cleaning too often is just as harmful as neglect. Here is a practical schedule to follow:
- Light spot cleaning: After every few wears, as needed. Address fresh stains immediately; the longer you wait, the harder they are to remove.
- Full at-home cleaning: Only when the jacket is visibly dirty or has developed a noticeable odor.
- Leather conditioning: Every three to six months. In dry climates, conditions are more frequent.
- Professional dry cleaning: Once or twice a year for regular wearers, or when DIY methods are not enough.
Brushing the wool regularly, wiping down the leather after wear, and airing the jacket out often will reduce how frequently you need a deep clean.
Long-Term Storage Tips to Protect Your Jacket
The way you store your varsity jacket has a direct impact on how long it lasts.
Always hang it on a wide, padded hanger. Wire hangers are too narrow and will distort the shoulder seams over time. Keep the jacket in a breathable cloth or cotton garment bag, never plastic. Plastic traps moisture and creates the perfect environment for mildew and musty odors.
Choose a cool, dry closet with proper airflow for storage. Avoid attics and basements, as these spaces attract moths, insects, mold, and humidity, all of which destroy both wool and leather. Add cedar blocks or natural moth repellents inside the bag for extra protection.
Before storing for the season, empty all pockets, fully zip or button the jacket, and make sure the leather sleeves are conditioned. If hanging is not an option, roll the jacket from the neckline downward. Do not fold it flat; folding creates permanent creases in leather that conditioning alone cannot fully undo.
When to Take It to a Professional
There are situations where home cleaning is not the right call, and recognizing them early saves your jacket from further damage.
Take your varsity jacket to a professional if it has deep-set stains that do not respond to spot cleaning, if the leather is cracking or peeling and needs restoration, if the jacket is vintage or heavily embroidered, or if it carries a persistent odor that airing out and baking soda cannot resolve.
Look for a dry cleaner with specific experience in leather and wool garments. A general cleaner without that background can cause more harm than good. For most regular wearers, a semi-annual professional cleaning, once at the start of the season and once at the end, is enough, along with home maintenance.
Final Thoughts
Cleaning a varsity jacket with leather sleeves comes down to one core principle: treat the wool body and the leather sleeves as two separate garments that happen to be attached to each other. Never apply the same product or method to both sections.
Use cold water and mild detergent on the fabric. Use a pH-neutral leather cleaner and conditioner on the sleeves. Air-dry always, and spot-clean stains while they are fresh. Condition the leather two to three times a year. Store it on a padded hanger in a breathable bag.
Taking care of varsity jacket care tips takes less time than you think, and they protect a garment that holds real sentimental or financial value. Follow the pre-cleaning checklist before every session, stay consistent with leather conditioning, and your jacket will stay clean, sharp, and wearable for decades.
Frequently Asked Questions
Can you safely machine wash a varsity jacket with leather sleeves?
No, you cannot. Machine washing causes wool to shrink and leather to crack due to agitation, heat, and detergent exposure. Spot cleaning and hand washing are the only safe methods. Always use cold water and treat each material separately.
How can you clean the leather sleeves without causing damage?
Apply a pH-neutral leather cleaner to a microfiber cloth and wipe the sleeves in gentle, even strokes. Never apply the product directly to the leather and avoid soaking it. Once dry, follow up with a quality leather conditioner to restore moisture and flexibility.
What cleaning products can you use on the fabric and leather parts?
Use a wool-safe mild detergent like Woolite for the fabric body. For leather sleeves, use a pH-balanced leather cleaner like Lexol or Chamberlain’s and a conditioner like Bick 4 or Leather Honey. Avoid bleach, alcohol, ammonia, and regular household sprays entirely.
How do you remove stains from the fabric body while protecting the leather sleeves?
Mix cold water with a small amount of mild detergent, and dab the stain gently with a damp microfiber cloth. Keep the cloth lightly damp, not wet, and make sure no moisture reaches the leather sleeves at any point during spot cleaning.
Should you condition the leather sleeves after cleaning, and how?
Yes, always condition after cleaning. Apply a small amount of leather conditioner to a soft cloth, spread it in a thin, even layer over the sleeves, and let it absorb for a few hours. Buff lightly afterward. Condition every three to six months to prevent dryness and cracking.
