How to Measure Jacket Size for Perfect Fit and Style
Trying on jackets can feel like a guessing game. You grab your usual size, but the sleeves are too short or the shoulders sag, and somehow nothing fits quite right. Yet, a jacket that fits perfectly is not a matter of luck. It comes down to proper measurements. In fact, skipping the right technique can lead to jackets that are off by as much as two full sizes, even with the same label on the tag. Most people just eyeball it and hope for the best, but the real secret is mastering a few simple steps that make every jacket fit like it was custom made just for you.
Table of Contents
- Step 1: Prepare Your Measuring Tools
- Step 2: Measure Your Chest Size
- Step 3: Measure Your Waist Size
- Step 4: Determine Your Sleeve Length
- Step 5: Check Your Shoulder Width
- Step 6: Verify Your Measurements For Accuracy
Quick Summary
| Key Point | Explanation |
|---|---|
| 1. Use a flexible fabric measuring tape | This tool adapts to body shapes and provides accurate jacket sizing compared to metal tapes. |
| 2. Measure while wearing lightweight clothing | Form-fitting clothes help ensure accurate measurements without adding bulk or misrepresentation. |
| 3. Take multiple measurements for accuracy | Repeating measurements helps identify discrepancies and ensures consistent results for better jacket fit. |
| 4. Record measurements in both inches and centimeters | Using both units gives flexibility when referring to sizing charts across different brands. |
| 5. Verify shoulder width for an ideal fit | Accurate shoulder measurements ensure the jacket sits correctly and comfortably on your body. |
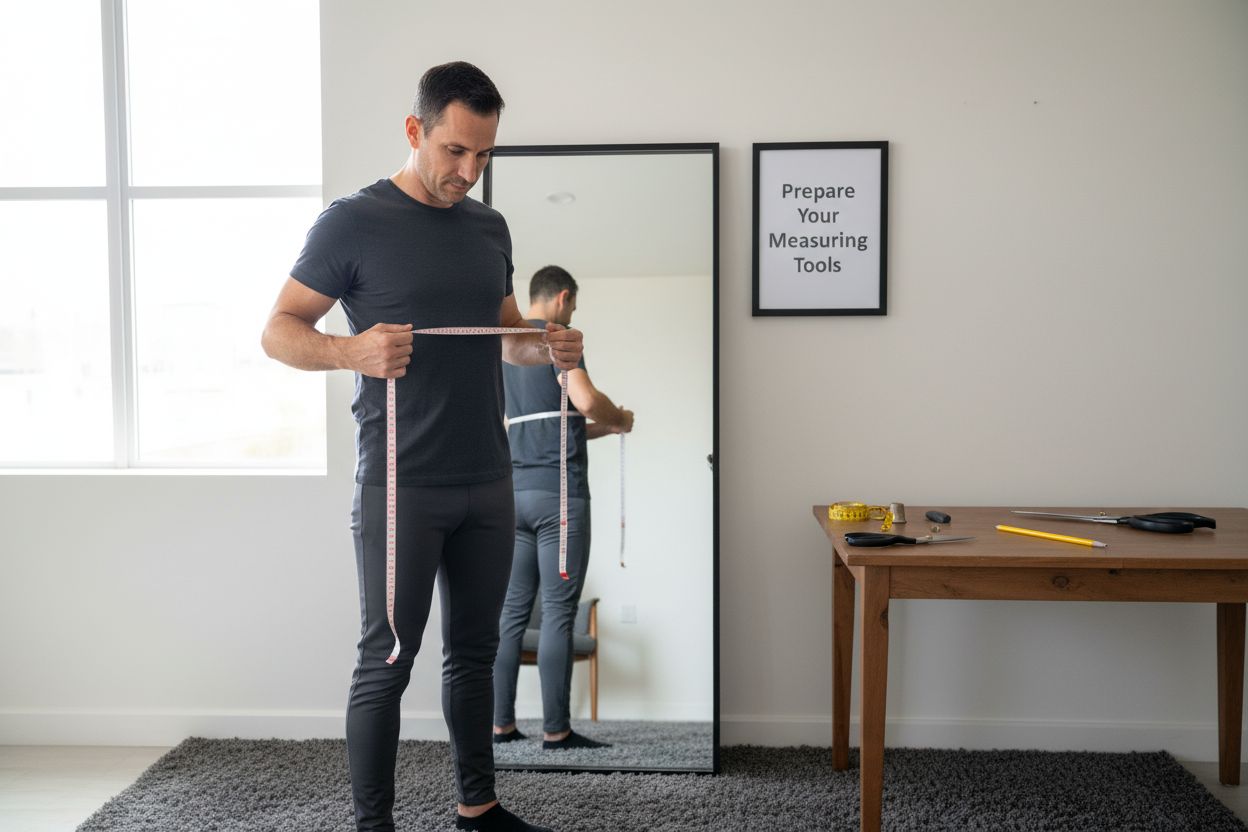
Step 1: Prepare Your Measuring Tools
Learning how to measure jacket size begins with gathering the right tools and creating an environment that ensures accurate measurements. The preparation stage is crucial because precision starts with having the correct equipment and understanding how to use it effectively.
Essential Measuring Tools
To get started, you will need a few key items that every home measurement enthusiast should have. A flexible fabric measuring tape is absolutely critical for this process. Unlike rigid metal tape measures, fabric measuring tapes conform to body contours and provide the most accurate jacket sizing information. Choose a measuring tape that is at least 60 inches long and has clear, easy-to-read markings in both inches and centimeters.
Additionally, you will want to have a full-length mirror positioned in a well-lit area. Natural light works best for ensuring you can see your measurements clearly and make adjustments as needed. If possible, position the mirror near a wall where you can stand straight and maintain proper posture during measurements.
Creating the Right Measurement Environment
When preparing to measure your jacket size, wear lightweight, form-fitting clothing that allows the measuring tape to sit close to your body without additional bulk. Thick sweaters or loose shirts can add unnecessary inches and lead to an inaccurate jacket fit. A thin t-shirt or fitted undershirt provides the ideal base for precise measurements.
Stand naturally with your feet shoulder-width apart, arms relaxed at your sides. Maintain good posture but avoid standing at attention or overly tensing your muscles. A relaxed, neutral stance ensures that your measurements reflect your actual body shape and will help you select a jacket that fits comfortably and looks great.
Before taking any measurements, double-check that your measuring tape is not twisted and lies flat against your body. Slight variations can significantly impact the final sizing, so take your time and be methodical. Remember that learning how to measure jacket size is a skill that improves with practice and patience.
Below is a summary table of essential measuring tools and why each is necessary for accurate jacket sizing.
| Tool | Specification/Usage | Purpose |
|---|---|---|
| Flexible fabric measuring tape | At least 60 inches, with inch/cm markings | Precise body measurements; adapts to contours |
| Full-length mirror | Positioned in well-lit area | Observe tape position and posture during measuring |
| Lightweight, form-fitting clothing | Thin t-shirt or fitted undershirt | Prevents added bulk and ensures accurate tape placement |
| Natural light (optional) | Use if available | Improves visibility of measurements |
| Friend/family member (optional) | Assist with hard-to-reach measurements | Ensures straight, level tape for maximum accuracy |
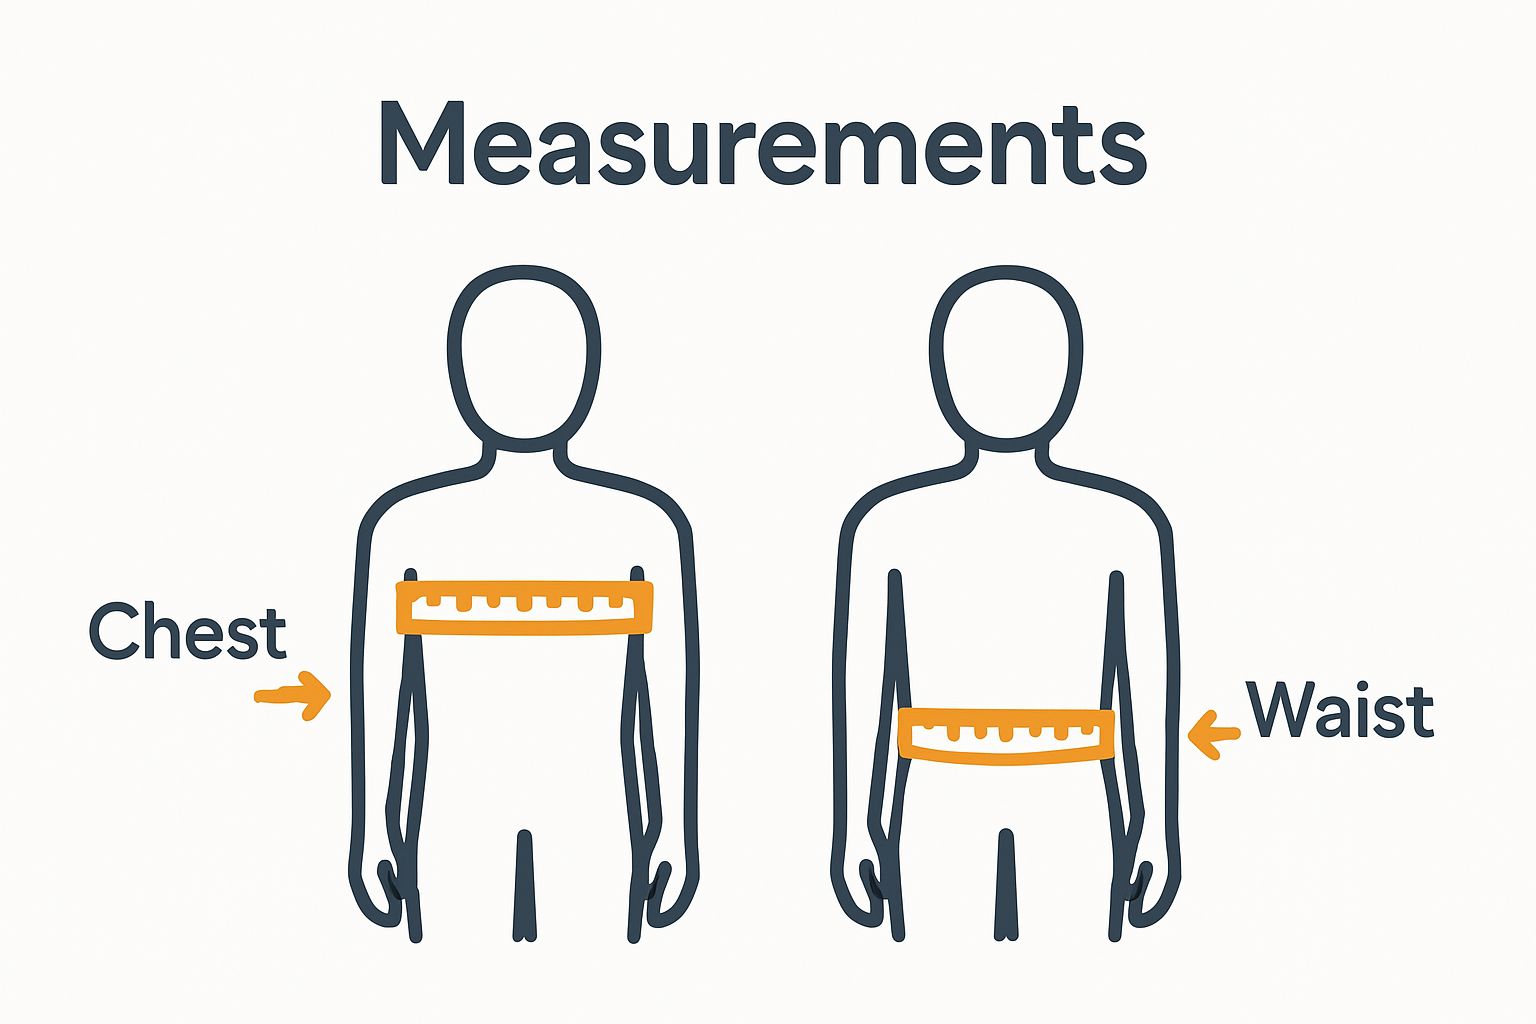
Step 2: Measure Your Chest Size
Measuring your chest size is the foundation of finding the perfect jacket fit. This critical step determines the overall comfort and appearance of your jacket, ensuring you look stylish and feel confident. Precision is key when taking chest measurements, as even a small variance can significantly impact how your jacket sits and moves with your body.
Positioning for Accurate Measurement
Begin by standing in front of your full-length mirror with your arms relaxed at your sides. Take a natural, comfortable stance that reflects your everyday posture. Wear a lightweight, form-fitting shirt that allows the measuring tape to follow your body’s natural contours without added bulk. If you plan to wear layers under your jacket, consider putting on a thin base layer similar to what you would typically wear beneath your outerwear.
Wrap the flexible measuring tape around the fullest part of your chest, which is typically right across the nipple line. Ensure the tape is horizontal and parallel to the ground, maintaining a consistent level all the way around your torso. Important: The tape should be snug but not tight. You want a measurement that allows for comfortable movement and potential layering. A good rule of thumb is to keep the tape comfortably close to your body without compressing your chest or creating gaps.
Checking and Confirming Your Measurement
Breath normally during measurement and avoid pulling the tape too tight or holding your breath.
If you’re measuring yourself, use the mirror to confirm the tape is straight and level. For the most accurate results, have a friend or family member help you take the measurement, as they can ensure the tape remains horizontal and positioned correctly.
Record your chest measurement in both inches and centimeters.
 Most jacket sizing charts will use one or the other, so having both measurements gives you flexibility. If your measurement falls between standard sizes, always size up for comfort. For instance, if you measure 40.5 inches and the sizing chart shows sizes at 40 and 42, choose the 42 to ensure a more comfortable fit.
If you’re interested in exploring jacket styles that complement your measurements, check out our Dragon Ball Super collection for inspiration on how different jacket cuts can showcase your body shape. Remember, a well-fitted jacket is not just about measurements, but about how it makes you feel when you wear it.
Step 3: Measure Your Waist Size
Measuring your waist size is a crucial step in finding a jacket that not only looks great but fits comfortably. Unlike chest measurements, waist measurements require a bit more nuance and attention to detail. The goal is to capture the natural contour of your body where jackets typically cinch or taper.
Finding Your Natural Waistline
Locate your natural waistline by standing upright and bending slightly to the side. Where your torso naturally creases is your waist’s narrowest point. According to Harvard Health, this area is important not just for fashion, but also for understanding your overall body composition. Stand in front of your mirror, relaxed and with good posture, wearing the same lightweight clothing you used for your chest measurement.
Wrap the flexible measuring tape around this specific area, keeping it parallel to the ground. Important: The tape should rest against your skin without compressing it. You want a measurement that allows comfortable movement. A good test is to ensure you can slip one finger comfortably between the tape and your body. This provides the right amount of ease for a jacket that looks tailored but not restrictive.
Verifying Your Measurement
Breath normally during measurement and avoid sucking in your stomach or holding your breath, as this can lead to an inaccurate reading. If possible, have a friend help you take the measurement to ensure the tape remains level and doesn’t twist. If you’re measuring yourself, use the mirror to check the tape’s position and maintain a natural stance.
Double-check your measurement by taking it two to three times. Consistency is key in getting an accurate waist size. Record the measurement in both inches and centimeters, as jacket sizing can vary between different brands and styles. If your measurement falls between standard sizes, always recommend sizing up slightly for comfort and layering potential.
Remember that waist measurements can fluctuate based on factors like time of day, recent meals, and physical activity. For the most reliable sizing, measure yourself in the morning before eating and when you’re in a relaxed state. This approach ensures you get the most consistent and accurate measurement for selecting the perfect jacket that complements your body shape and personal style.
Step 4: Determine Your Sleeve Length
Sleeve length is the defining element that transforms a good jacket into a perfect one. An ill-fitting sleeve can make even the most expensive jacket look awkward and uncomfortable. Your goal in this step is to capture a precise measurement that ensures your jacket sleeves complement your body’s proportions.
Positioning for Accurate Sleeve Measurement
Stand in a relaxed position with your arm slightly bent at the elbow, mimicking a natural stance. This positioning helps capture the most realistic sleeve length for everyday wear. Start by placing the measuring tape at the center back of your neck, where the shoulder seam of a well-fitted shirt would typically sit. Trace the tape over the top of your shoulder, down the outside of your arm, and continue to your desired sleeve endpoint.
For most jackets, the ideal sleeve length ends at the base of your thumb or just where your wrist bone begins. Important: Keep the measuring tape slightly loose, allowing for about a quarter-inch of ease. This small amount of extra space ensures you can move your arms comfortably and provides room for potential layering. If you frequently wear sweaters or long-sleeved shirts under your jacket, consider adding a bit more length to accommodate those extra layers.
When measuring, pay attention to your dominant arm, as it might be slightly longer. If there’s a noticeable difference between your left and right arm lengths, always use the longer measurement to ensure a comfortable fit. Some people find their sleeve length can vary by up to half an inch between arms, so this careful observation can make a significant difference in jacket comfort.
If you’re looking for inspiration on how different sleeve lengths can transform a jacket’s appearance, explore our wine short faux fur coat collection to see how sleeve proportions can dramatically change a garment’s overall style. Professional tailors often recommend that jacket sleeves should show about a half-inch of shirt cuff when your arms are at your sides, creating a polished and intentional look.
To verify your measurement, repeat the process two to three times and compare results. Consistency is key. Write down your sleeve length in both inches and centimeters, keeping in mind that different jacket styles might require slight variations in how you interpret this measurement. A bomber jacket, for instance, might fit differently than a structured blazer, so always consider the specific style when selecting your size.
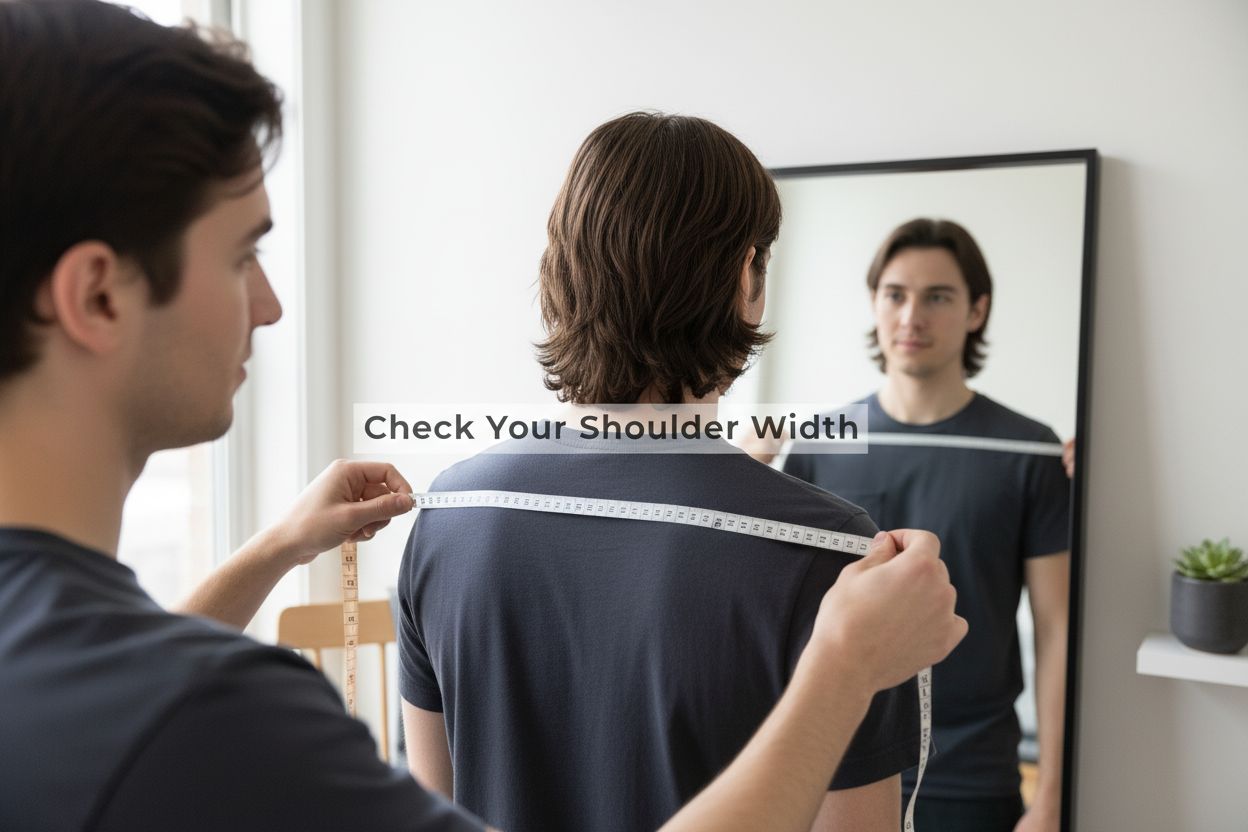
Step 5: Check Your Shoulder Width
Shoulder width is the architectural foundation of how a jacket fits and looks on your body. This critical measurement determines whether a jacket will drape elegantly or appear awkward and ill-fitting. Understanding and measuring your shoulder width correctly can transform your entire jacket-wearing experience.
Measuring Shoulder Dimensions Precisely
Begin by standing naturally in front of your mirror, maintaining a relaxed posture with your arms at your sides. To measure shoulder width, place the flexible measuring tape from the outer edge of one shoulder to the outer edge of the opposite shoulder. Important: Ensure the tape remains horizontal and level across your back, following the natural curve where your shoulders meet your upper back. This point is typically where your shoulder seams would sit on a well-fitted shirt.
Avoid pulling the tape too tight or letting it sag. The measurement should capture your natural shoulder structure without compression. If possible, have a friend help you take this measurement to ensure accuracy. When measuring yourself, use the mirror to confirm the tape remains straight and parallel to the ground. Some individuals find their shoulder width can vary slightly depending on muscle definition or posture, so taking multiple measurements provides the most reliable result.
Understanding Shoulder Measurement Variations
Recognize that shoulder width differs significantly between jacket styles. A structured blazer requires a more precise fit compared to a relaxed bomber jacket. Typically, jacket shoulders should extend just to the edge of your natural shoulder line without hanging over or pulling inward. If the shoulder seam extends beyond your actual shoulder by more than half an inch, the jacket will look oversized. Conversely, if the seam sits significantly inward, the jacket will feel restrictive and uncomfortable.
Consider your body type and personal style when interpreting shoulder measurements. Broader shoulders might require additional considerations for fit, while narrower frames could benefit from jackets with subtle padding to create visual balance. Our wine short faux fur coat collection demonstrates how different shoulder treatments can dramatically change a jacket’s overall appearance.
To verify your measurement, repeat the process two to three times and compare results. Record your shoulder width in both inches and centimeters. Remember that comfort and confidence are the ultimate goals. A perfectly measured jacket should feel like a second skin, allowing you to move freely while looking impeccably styled.
Step 6: Verify Your Measurements for Accuracy
Verifying your measurements is the final and most critical step in ensuring you select a jacket that fits perfectly. Even the most carefully taken initial measurements can have subtle variations that could impact your overall jacket fit. Think of this stage as your quality control checkpoint, where precision meets personal style.
Cross-Checking Measurement Techniques
Important: Take each measurement at least three times to establish consistency. Use different techniques to validate your initial results. For chest measurements, try measuring both with arms relaxed at your sides and with arms slightly raised. For waist and sleeve measurements, alternate between self-measurement and having a friend assist you. Small discrepancies can reveal nuances in your body’s natural contours that a single measurement might miss.
Pay special attention to how you stand during measurements. Your posture can significantly impact the numbers. Stand naturally but maintain good alignment avoid slouching or over-stretching. A neutral, relaxed stance provides the most accurate representation of your body’s true dimensions. If you notice more than a quarter-inch variation between measurements, pause and reassess your technique.
Comparing Against Standard Sizing Charts
Once you have consistent measurements, compare them against multiple sizing charts. Different jacket manufacturers can have slightly different sizing standards. Some brands might run larger or smaller, so look beyond a single chart. If your measurements fall between two sizes, consider the specific jacket style and your intended wearing purpose. A motorcycle leather jacket might require a different fit approach compared to a tailored blazer.
Don’t rely solely on numbers. Consider your body type, muscle definition, and personal comfort preferences. If you frequently layer clothing underneath your jackets, you might want to add a small amount of ease to your measurements. Our wine short faux fur coat collection offers excellent examples of how different body types can beautifully accommodate varied jacket styles.
A final pro tip: record your measurements in both inches and centimeters, and keep this personal sizing reference for future clothing purchases. Bodies change over time, so periodically re-measuring ensures you always have an up-to-date sizing profile. Remember, a perfectly fitted jacket is not just about numbers it’s about how confidently you wear it.
Here is a checklist to help you verify your jacket measurements for accuracy and ensure your final fit is comfortable and reliable.
| Verification Step | How to Complete | Why It Matters |
|---|---|---|
| Repeat each measurement 2-3 times | Take measurements multiple times | Helps identify discrepancies |
| Use different measuring techniques | Alternate between self- and assisted-measuring | Captures true body contours |
| Check posture during measurement | Stand naturally, avoid slouching | Prevents misleading or incorrect results |
| Compare results against sizing charts | Match measurements to several brand charts | Adjusts for brand-specific differences |
| Add ease for layering if needed | Consider intended use and layers | Ensures comfort and jacket versatility |
| Record in both inches and centimeters | Write down both units | Prepares you for multiple sizing systems |
Ready for a Jacket That Finally Fits the Way You Want?
Finding the right jacket size is a real challenge. Even after carefully following every step in this guide—measuring your chest, waist, sleeve length, and shoulder width—most people still worry about choosing a jacket that actually fits and flatters their style. If you are tired of guessing your size or ending up with jackets that never look quite right, you are not alone. At Maker of Jacket’s collection, we provide a direct solution to all your sizing concerns with a huge selection of customizable jackets, detailed size guides, and real customer testimonials that prove you can get the look and comfort you deserve.
Stop letting uncertainty hold you back. Shop now at Maker of Jacket and experience made-to-measure style, with ready access to our full range of designs and worldwide free shipping. Use your new measurements today to find or customize your next jacket and step forward with confidence. Explore our Mustang jacket collection for some of our most popular themes and see how the perfect fit changes everything.
Frequently Asked Questions
How do I accurately measure my chest size for jacket fitting?
To measure your chest size, wrap a flexible measuring tape around the fullest part of your chest, usually across the nipple line. Ensure the tape is snug but not tight, and record the measurement in both inches and centimeters for flexibility in sizing.
What is the best way to determine my waist size for a jacket?
Locate your natural waistline by bending slightly to the side to find the narrowest point, then wrap the tape around this area ensuring it’s parallel to the ground and comfortably snug. Double-check it two to three times to ensure consistency, and record your waist measurement in both inches and centimeters.
How do I measure my sleeve length to ensure a perfect fit?
To measure sleeve length, start at the center back of your neck, trace over your shoulder, and down to your wrist with your arm slightly bent. Use this measurement as your guide to ensure your jacket sleeves fit comfortably—ideally ending at the base of your thumb.
What is the correct way to measure my shoulder width for jacket sizing?
Identify your shoulder width by measuring from the outer edge of one shoulder to the other while keeping the tape horizontal across your back. Make sure the tape follows the natural curve of your shoulders—repeat the measurement a few times to confirm accuracy.
How can I verify my jacket measurements for accuracy?
To verify your measurements, take each one multiple times and use different techniques—measure both with arms relaxed and slightly raised. Compare your results against standard sizing charts to ensure the best fit that accommodates your body type and layering preferences.
How can I ensure my jacket fits well if my measurements fall between sizes?
If your measurements fall between sizes, always choose the larger size for comfort, particularly if you intend to layer underneath. This helps avoid a tight fit and ensures ease of movement in your jacket.
