

Leather Jacket Mold: Stop Regrowth, Dry First and Store Below 60% RH

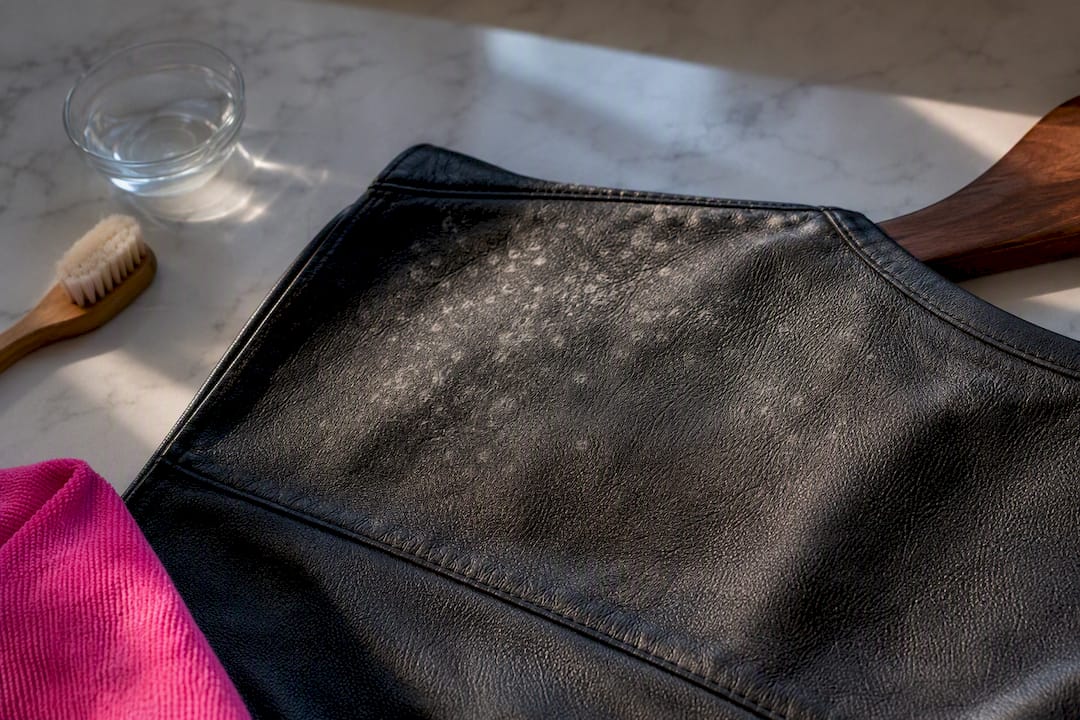
Most mold on a leather jacket can be removed if you catch it early and act correctly. The single most important move is to isolate the jacket, take it outside or to a ventilated room, put on gloves and an N95 mask, and dry-remove the loose spores with a HEPA vacuum or soft brush before anything gets wet. Skip that step and wipe it with a damp cloth first, and you’ll likely smear spores deeper into the hide instead of lifting them out. If you have mold allergies or a compromised immune system, stop and call a professional rather than handling it yourself.
TL;DR:
- Most mold on a leather jacket can be removed if caught early by dry-vacuuming or brushing off spores before any wet cleaning or scrubbing.
- Leather must be contained outdoors or in a ventilated space while wearing PPE, and aggressive methods like bleach or heat should be avoided to prevent damage.
- Confirm whether the growth is mold or a surface issue like wax, salt, or dirt using visual clues, odor, UV light, or test swabs before proceeding with cleaning.
- Fully dry the jacket in a shaded, well-ventilated area to prevent mold re-growth, avoiding heat sources, and only condition once it is completely dry.
- For extensive, persistent, or deep damage, or if health risks exist, professional conservation is recommended over DIY methods.
Table of Contents
- Leather Jacket Mold: Containment Steps to Take Right Now
- Is It Mold, or Just Wax, Salt, or Dirt?
- What You Need Before You Start Cleaning
- How to Clean Mold Off a Leather Jacket, Step by Step
- Drying and Conditioning Without Triggering Regrowth
- When to Call a Professional Instead of DIY-ing It
- Preventing Mold on a Leather Jacket for Good
- Maker’s Quick Reference for Leather Jacket Care
- A Practical Take on DIY Mold Removal
- Where Makerofjacket Fits When Your Jacket Doesn’t Make It
- Sources
- FAQ
Leather Jacket Mold: Containment Steps to Take Right Now
Before you touch a cleaner, treat the jacket like a small biohazard rather than a laundry problem. Mold spores travel easily through the air and settle on nearby fabric, so the first ten minutes matter more than the products you eventually use.
- Move the jacket away from other clothing. Hang it alone, ideally outdoors or in a garage, away from closets and upholstery.
- Put on an N95 mask and nitrile gloves before you touch it. Mold exposure can trigger respiratory irritation even in people without known allergies.
- Work in a ventilated space. Open windows or work outside so spores disperse instead of settling back onto the leather or the floor.
- Vacuum or brush off loose growth first. A HEPA vacuum with a soft brush attachment, or a plain soft-bristled brush, lifts dry spores without spreading moisture. The Canadian Conservation Institute recommends this dry-removal step before any wet cleaning, since wetting active mold first tends to smear it into the fibers rather than lift it out.
- Do not use heat, direct sunlight, or bleach. Heat and sun dry out and crack leather, and bleach breaks down the finish and dyes.
- Set aside a small test area and your cleaning supplies. You’ll spot-test before doing anything else, and it helps to have alcohol, a clean cloth, and cotton swabs on hand.
Once the loose spores are off and the jacket is contained, you’re in a much safer position to figure out exactly what you’re dealing with.
Is It Mold, or Just Wax, Salt, or Dirt?
Leather does a lot of things that look alarming but have nothing to do with mold. Before you commit to a cleaning routine, confirm what’s actually on the jacket.
Genuine mold usually shows up in specific places first: seams, folds, the underarms, and especially the interior lining, where airflow is weakest and moisture lingers longest. It tends to start as a thin, powdery white or gray haze rather than a dramatic patch, and a musty, damp odor almost always accompanies it even before the growth is visible to the naked eye. According to guidance from Indoorhumidity, raking a flashlight across the surface at a low angle, or using a UV blacklight in a dark room, can reveal early colonies that are otherwise nearly invisible.
Here’s how to tell mold apart from the leather’s own natural quirks:
- Wax bloom (spew): a whitish, waxy film that appears on vegetable-tanned leather, often after storage in cool conditions. It usually wipes off dry with a cloth and leaves no smell.
- Salt stains: blotchy white marks from sweat or rain, typically stiff to the touch rather than soft or fuzzy, and concentrated where the body or rain hit the leather.
- Simple dust or dirt: dull, gray film that brushes away easily and has no odor.
- Mold or mildew: powdery, fuzzy, or slightly raised texture, often greenish, black, or gray, paired with a musty smell that gets stronger in humid weather.
If you’re still unsure, swab a small area with a bit of mineral spirits on a cotton pad. Wax bloom typically dissolves and lifts cleanly; mold generally does not respond the same way and may smear slightly instead.
Pro Tip: If the growth reappears in the same spot within a week or two of cleaning, treat it as active mold rather than residue. Dead residue doesn’t come back on its own.
What You Need Before You Start Cleaning
Gathering everything up front keeps you from touching contaminated tools to clean surfaces and stops you from improvising with the wrong product mid-cleanup.
Personal protection:
- N95 or higher-rated respirator mask
- Nitrile or rubber gloves
- Eye protection if you’re dealing with a heavily affected jacket
Tools:
- HEPA vacuum with a soft brush attachment
- A separate soft-bristled brush (horsehair brushes work well on leather)
- Microfiber cloths, several
- Cotton swabs for detail work and testing
- Small bowls for diluting cleaners
Cleaners to have ready:
- 70% isopropyl alcohol
- A mild, pH-neutral leather cleaner or saddle soap
- Distilled white vinegar, diluted with water, for lingering odor
- A quality leather conditioner for after the jacket dries completely
Skip bleach and harsh solvents as a default choice. They’re too aggressive for regular leather care and tend to strip color and finish faster than they solve the mold problem, a point echoed in home-care guidance from The Spruce. When you’re done, wash the brush and vacuum attachment separately from anything else, and wipe down surfaces the jacket touched. Reusing a mold-contaminated brush on your next cleaning job just reintroduces spores.
How to Clean Mold Off a Leather Jacket, Step by Step
The right method depends heavily on what kind of leather you’re working with. A biker jacket in smooth, finished cowhide tolerates far more moisture than a suede bomber or an aniline-dyed piece. Rushing this step is where most DIY attempts go wrong.
Universal first steps, regardless of leather type
- Isolate the jacket and put on your PPE if you haven’t already.
- Vacuum close to the surface with a soft-brush attachment, going over the area twice in perpendicular passes to lift spores the first pass missed.
- Photograph the affected areas before you clean, so you have a reference if color or texture changes later.
- Choose a hidden spot, an inside cuff or the underside of a collar, and test your cleaner there first. Wait several minutes and check for darkening, stiffening, or color transfer before treating the visible area.
Finished or pigmented leather (most biker and bomber jackets)
This is the most forgiving category and the one many customers own. After the spot test clears:
- Dampen a cloth, not soaked, with 70% isopropyl alcohol.
- Wipe the affected area in one direction rather than scrubbing back and forth, which can push residue into the grain.
- Follow with a cloth dampened in mild soap solution to lift any remaining film.
- Blot with a dry cloth immediately. Don’t let the leather sit wet.
Home-care guidance backs this approach for many finished leathers, provided the spot test comes back clean first.
Aniline, uncoated, and vegetable-tanned leather
These leathers absorb moisture readily and darken permanently if you’re not careful. Favor dry methods: vacuum, soft brush, and a dry microfiber cloth for as long as they’re working. If you must use liquid, apply it to a swab rather than a cloth, and touch only the mold spot, not the surrounding leather. Given how easily aniline leather tide-marks or darkens unevenly, treat any widespread growth on this type as a signal to call a conservator rather than push further with home remedies, a caution TDN Leather raises specifically for this material.
Oil and wax pull-up leather
This leather changes color when pressure or moisture touches it, which is part of its appeal but a hazard during cleanup. Use the lightest touch possible. Test more conservatively than you would with finished leather, since color shift shows up faster here. Once clean and fully dry, a light conditioner often restores the pull-up effect that heavy handling can temporarily flatten.
Suede and nubuck
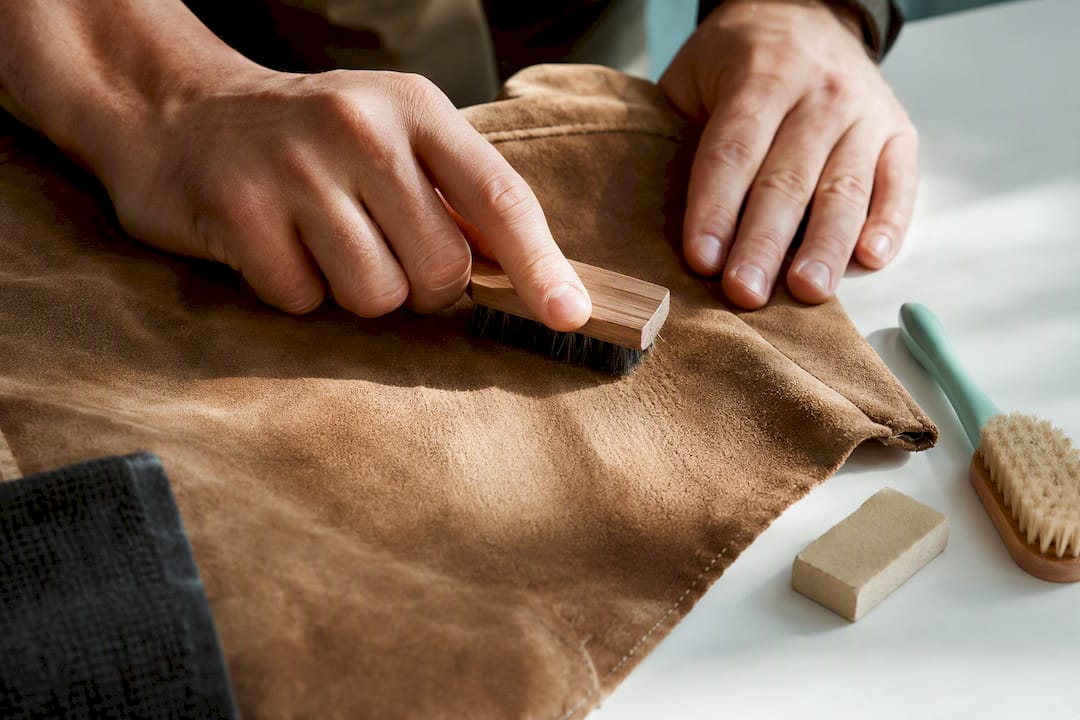
Skip liquids entirely if you can. A suede brush, worked gently in one direction, handles a lot of surface mold on its own. A suede eraser lifts the rest in most cases. If the growth persists after two or three careful passes, stop and get professional help. Suede fibers trap spores in a way smooth leather doesn’t, and aggressive brushing just grinds them in deeper.
Patent leather and exotics
Patent leather’s glossy coating tolerates mild soap and water reasonably well, closer to cleaning vinyl than cleaning hide. Exotic skins, snake, alligator, ostrich, are a different story. Their scale patterns and thinner hides are far less forgiving of DIY chemical exposure, and conservator-level care is usually the safer call.
If a stain remains after the mold is gone
Repeat light passes with your chosen cleaner rather than scrubbing harder on one spot. Scrubbing concentrates friction and heat in one area, which is exactly what causes uneven color loss. Patience across several gentle passes beats one aggressive one every time.
Pro Tip: Keep a second, clean cloth just for the final wipe-down. Reusing the same cloth you used to lift mold just redeposits spores across the surface you already cleaned.
Drying and Conditioning Without Triggering Regrowth
Moisture left behind is the single biggest reason mold comes back within weeks of cleaning. Spores that survive the cleaning process, and some always do, need a damp environment to establish themselves again. Dry the jacket completely, and you starve them out.
- Air-dry in a shaded, ventilated space with moving air. A fan pointed nearby speeds things up without adding heat.
- Never use a hair dryer, radiator, or direct sunlight. Heat causes leather to shrink, stiffen, and crack.
- Stuff pockets loosely with acid-free paper to hold their shape and absorb interior moisture as it evaporates.
- Turn the jacket inside out periodically during drying so the lining and seams, where moisture hides longest, get direct airflow too.
- Check seams and underarm areas by feel after 24 hours. If they still feel cool or damp, keep drying.
The Canadian Conservation Institute notes that if a jacket is too wet to dry quickly, sealing it in a polyethylene bag and freezing it halts active mold growth, though it won’t kill spores outright. Thaw and dry it fully once you’re ready to finish the cleaning process.
Only condition the jacket once it’s bone dry, not damp, not “mostly dry.” Applying conditioner to residual moisture traps it under the new layer and can invite the exact regrowth you just fixed. Test any conditioner on the same hidden spot you used for your cleaner, and choose one made for the leather type you have. Our guide to softening a leather jacket walks through picking and applying conditioner without over-saturating the hide.
When to Call a Professional Instead of DIY-ing It
Some jackets are past the point where a vacuum and a bottle of isopropyl alcohol will fix things. Recognizing that early saves you from making the damage worse.
- Brittleness or crumbling edges. If the leather flakes or crumbles when you flex it, the fibers have already broken down structurally, and cleaning won’t reverse that.
- Stains that return after cleaning. Mold that keeps resurfacing in the same spot after proper drying often means it has penetrated past the surface into the hide itself.
- Growth covering large areas or multiple garments. Widespread contamination usually points to an environmental problem, like a damp closet, that DIY spot cleaning won’t solve on its own.
- Health concerns in the household. Severe mold allergies, asthma, or a compromised immune system in anyone nearby is reason enough to hand the jacket to a professional rather than risk exposure.
Professional textile and leather conservators use fungicidal treatments, controlled drying chambers, and material-specific techniques that go well beyond home methods, which is why the service costs more than a bottle of alcohol wipes. For a jacket with sentimental or financial value, that cost is often the cheaper option compared to losing the garment entirely.
Preventing Mold on a Leather Jacket for Good
Mold needs moisture and stagnant air to establish itself, and both are entirely within your control once you know the numbers. The Canadian Conservation Institute’s testing found mold can develop in as little as 2 days at 90 to 100% relative humidity, roughly 10 days at 80% RH, and around 100 days at 70% RH. Keep the storage environment below 60 to 65% relative humidity, and you push that growth timeline out far enough that routine checks catch problems before they start, a threshold also cited by The Spruce.
- Use a hygrometer in your closet to actually know your humidity, rather than guessing.
- Add silica gel packets near stored jackets, and swap them out once they stop feeling dry to the touch.
- Run a small dehumidifier in closets prone to dampness, especially in basements or exterior-wall rooms.
- Store jackets in breathable garment bags, never sealed plastic, which traps whatever moisture is already there.
- Leave space between garments so air actually circulates instead of sitting still.
- Fix the root moisture source. A leaking pipe, poor bathroom ventilation, or a damp basement wall will undo any storage precaution you take.
Inspect stored jackets at each season change. Air them out for an hour before hanging them back up, and check seams and linings by feel, not just by sight. Our leather jacket storage guide covers garment bag choices and closet setup in more detail if you’re storing multiple pieces long term.
Pro Tip: Never bag up a jacket for storage right after wearing it in rain or heavy sweat. Let it air-dry fully first, even if that means it sits on a hanger for an extra day before it goes back in the closet.
Maker’s Quick Reference for Leather Jacket Care
A few habits separate jackets that last decades from ones that need mold treatment every winter. Spot-test every new cleaner on an inside seam first, always, even products you’ve used successfully on a different jacket. Leather batches vary, and what worked on one hide can react differently on another.
Inspect stored jackets every three months, not just at the start of a new season. Catching a musty smell early means a five-minute fix instead of a weekend project.
For a deeper walk-through of cleaning and restoring a moldy jacket specifically, our step-by-step mold removal guide covers the process in more detail than space allows here, and our full cleaning process guide is worth bookmarking for regular maintenance beyond mold. If cleaning reveals cracking, deep discoloration, or damage you don’t feel confident fixing, our scratch and surface repair guide can help you figure out whether it’s a repair job or a replacement decision.
A Practical Take on DIY Mold Removal
Most people overreact to the sight of mold and underreact to what actually causes it. The mold itself is rarely the real problem. Whatever humidity, storage, or airflow condition let it grow in the first place is the thing that will keep coming back if you don’t fix it.
The biggest mistake I see in DIY mold removal isn’t using the wrong cleaner. It’s scrubbing too hard or soaking the leather to “make sure it’s really clean.” Both do more damage than the mold ever would. A light touch, a proper spot test, and patience through multiple gentle passes beat aggression every time.
If you own something irreplaceable, a family heirloom, a rare suede piece, an exotic skin, don’t treat DIY removal as the default. Get a professional opinion before you start. For everything else, a careful, dry-first approach saves the vast majority of jackets people assume are ruined.
— Maker
Where Makerofjacket Fits When Your Jacket Doesn’t Make It
Sometimes cleaning reveals damage that goes deeper than mold, cracked seams, stiff patches that never soften back up, or a finish that’s simply too far gone to restore. That’s the point where repair stops making financial sense and replacement starts looking like the smarter move.

Custom leather jackets can be built to your exact measurements, style, and material preference, so you’re not stuck settling for whatever fits closest off a rack. Every order goes through a detailed customization process that lets you choose the leather grade, lining, and hardware yourself, which matters if you’re replacing a jacket that failed you because of a cheap hide or poor stitching in the first place. If your current jacket is beyond saving, start your own custom leather jacket order today and build something that’s actually made to hold up under the same storage habits that just saved the last one.
Sources
This guide draws on conservation-grade and home-care sources rather than generic cleaning advice:
- Removing mould from leather – Canadian Conservation Institute (CCI) Notes
- How to Remove Mildew From Leather — The Spruce
- How to Remove Mold from Leather (TDN Leather)
- Indoorhumidity
FAQ
Can a moldy leather jacket be saved?
Yes, in most cases, if you catch it early and dry-remove the spores before any wet cleaning. Jackets with brittle, crumbling leather or deep structural damage are less likely to fully recover, even with professional help.
Why is my leather jacket moldy?
Mold grows on leather when relative humidity stays high for an extended stretch, and growth can start in as little as 2 days at 90 to 100% RH. Sealed plastic storage, damp closets, and packing away a jacket before it’s fully dry are the most common triggers.
Is mold on leather harmful?
Mold exposure can cause respiratory irritation and allergic reactions, and the risk is higher for people with asthma, mold allergies, or a compromised immune system. Wear an N95 mask and gloves when handling any moldy garment, and skip DIY cleaning entirely if you fall into a higher-risk group.
Can moldy leather be fixed?
Surface mold and mildew on finished leather usually clean up well with dry removal followed by a properly spot-tested wipe of diluted vinegar or 70% isopropyl alcohol. Mold that has penetrated the fibers, especially on suede or aniline leather, often needs professional conservation rather than home treatment.


