

CE Level 2 Armor That Cuts Peak Force in Half and Fits Riders’ Jackets

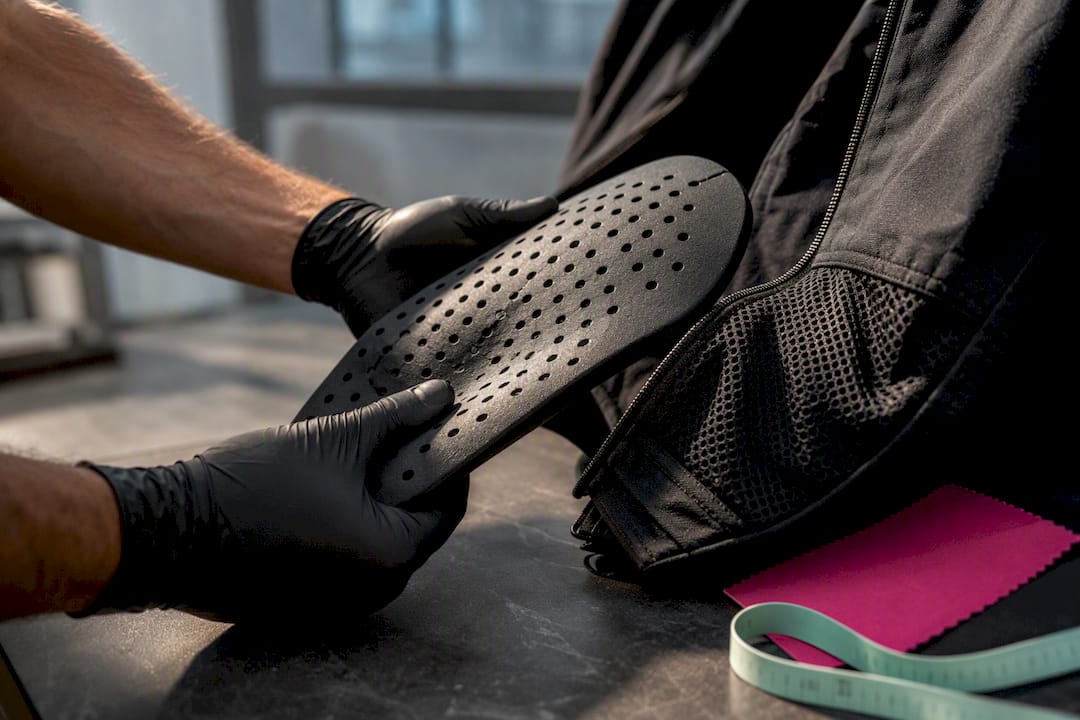
CE Level 2 armor is the higher of two EN1621 performance tiers, and it transmits roughly half the peak force to your body that Level 1 gear allows in the same impact. Riders who spend real time at highway speed, tour long distances, or push into track days should default to Level 2 whenever fit and comfort allow. Look for the EN1621 code on the label, not just a CE logo, before you trust a claim. Some jackets are built with pockets sized for these thicker inserts precisely so that trade-off doesn’t cost you comfort.
TL;DR:
- CE Level 2 armor reduces transmitted force by about half compared to Level 1, with back protectors averaging below 9 kN and limb protectors below 20 kN in lab tests.
- Always verify the specific EN1621 code on the protector label itself, not just the CE mark or jacket tags, to confirm genuine motorcycle impact-rated armor.
- Proper fit and secure placement are crucial, as armor shifting during a crash negates Level 2 protection regardless of lab-certified standards.
- Use non-Newtonian materials like D3O or SAS-TEC for effective, thinner Level 2 inserts that perform well across temperature ranges, but inspect and replace worn or damaged pads regularly.
- Rely on EN1621 certification, not vague claims or CE logos alone, when choosing armor, since standards like ASTM or other labels do not reliably specify motorcycle impact protection.
Table of Contents
- What CE Level 2 Armor Certification Actually Means
- The Lab Numbers: Level 1 vs Level 2 Thresholds
- The Materials Behind Level 2 Performance
- What Level 2 Actually Prevents, and What It Doesn’t
- The Fit Checklist That Makes Certification Count
- How to Verify CE Level 2 Before You Buy
- Fitting CE Level 2 Armor Into Jackets, Pants, and Suits
- Keeping Level 2 Armor Working Over Years of Riding
- Myths That Get Riders Hurt
- How CE Level 2 Stacks Up Against Other Global Standards
- Maker of Jacket’s Perspective: Designing for Protection You’ll Wear
- Get a Jacket Built Around the Armor You Actually Chose
- Sources
What CE Level 2 Armor Certification Actually Means
The CE mark by itself tells you almost nothing. It confirms a product meets some European safety directive, but plenty of gear carries a CE stamp for reasons that have nothing to do with crash protection. What matters is the specific EN1621 code printed alongside it, because that number tells you exactly which body part the protector is rated for and how well it performs.
Three sub-standards cover motorcycle body armor, and each one tests a different zone:
- EN1621-1 covers limb protectors: elbows, shoulders, knees, and hips.
- EN1621-2 covers back and spine protectors, tested with different geometry because the spine tolerates far less force than a limb joint.
- EN1621-3 covers chest protectors, a category still catching up in adoption compared to back and limb armor.
Within EN1621-1, you’ll also see shorthand for shape: Type A protectors cover a smaller, localized area, while Type B covers more surface around the joint. Back protectors carry their own shorthand too, split between CB (central back, covering the spine column) and FB (full back, extending across the shoulder blades and lower back). A Wikipedia summary of motorcycle armor standards breaks down how these codes map to specific body regions, which is worth a quick read before you buy anything with “armor” in the product title.
Here’s the label trap that catches new riders: a jacket can say “CE approved” in bold letters on a swing tag while the actual insert inside is only rated for skateboarding or skiing, not motorcycle impacts. If you don’t see EN1621-1, EN1621-2, or EN1621-3 printed on the protector itself (not just the jacket’s marketing copy), you don’t actually know what you’re wearing. Always flip the pad over and look for the stitched-in or molded label with the EN code and the level number.
The Lab Numbers: Level 1 vs Level 2 Thresholds
Level 2 isn’t a marketing tier. It’s a specific, measurable performance bar set by lab testing, and the gap between it and Level 1 is bigger than most riders assume.
The numbers that matter: For back protectors under EN1621-2, Level 1 caps transmitted force at an average peak below 18 kN with no single impact exceeding 24 kN. Level 2 cuts that to an average peak below 9 kN, with no single reading over 12 kN. For limb protectors under EN1621-1, Level 2 typically holds mean transmitted force under roughly 20 kN, versus Level 1’s ceiling near 35 kN.
That’s essentially half the transmitted force for back protection, and a meaningful cut for limbs too. The test itself is straightforward in concept: a defined impactor, roughly 5 kilograms, drops onto the protector at a set height to deliver about 50 joules of energy. Sensors underneath record the peak force that makes it through the material, in kilonewtons, across multiple strikes on the same sample.
Labs report two figures for a reason. The mean score tells you how the protector performs on average across several hits. The single-impact maximum tells you the worst-case reading, the spike that matters most in an actual crash where you don’t get a second chance. A protector could post a decent average and still fail if one strike spikes past the ceiling, which is why both numbers get checked before a Level 2 rating is awarded.
The Materials Behind Level 2 Performance
Older armor relied on rigid plastic shells over dense foam. That combination worked, but it was bulky, hot, and often uncomfortable enough that riders skipped wearing it on short trips. Modern Level 2 gear gets its performance from a different approach entirely.
Materials in the D3O and SAS-TEC families are non-Newtonian: soft and flexible during normal riding movement, then locking rigid the instant an impact hits. That behavior is what lets a thinner pad hit Level 2 thresholds without the stiffness of old-school shell armor. You get the force reduction without feeling like you’re wearing a hockey pad under your jacket.
Temperature matters more than most riders realize. The EN1621 testing framework includes ageing and temperature stability checks, often labeled T+ and T-, confirming a protector still performs at both roughly +40°C and -10°C. A pad that only works well at room temperature is a liability if you ride through a hot afternoon or a cold morning commute, since impact materials can stiffen or soften outside their designed range.
There are real trade-offs to weigh:
- Cost: Level 2 inserts using advanced viscoelastic compounds typically cost more than basic foam.
- Thickness: Level 2 is thinner than old shell designs but still thicker than minimal Level 1 pads.
- Ventilation: denser impact material can trap more heat than open-cell foam, a real factor on long summer rides.
Pro Tip: Squeeze a protector slowly between your fingers before buying. If it stays soft and pliable under gentle pressure but firms up when you snap it quickly, that’s the non-Newtonian behavior doing its job, not a defect.
What Level 2 Actually Prevents, and What It Doesn’t
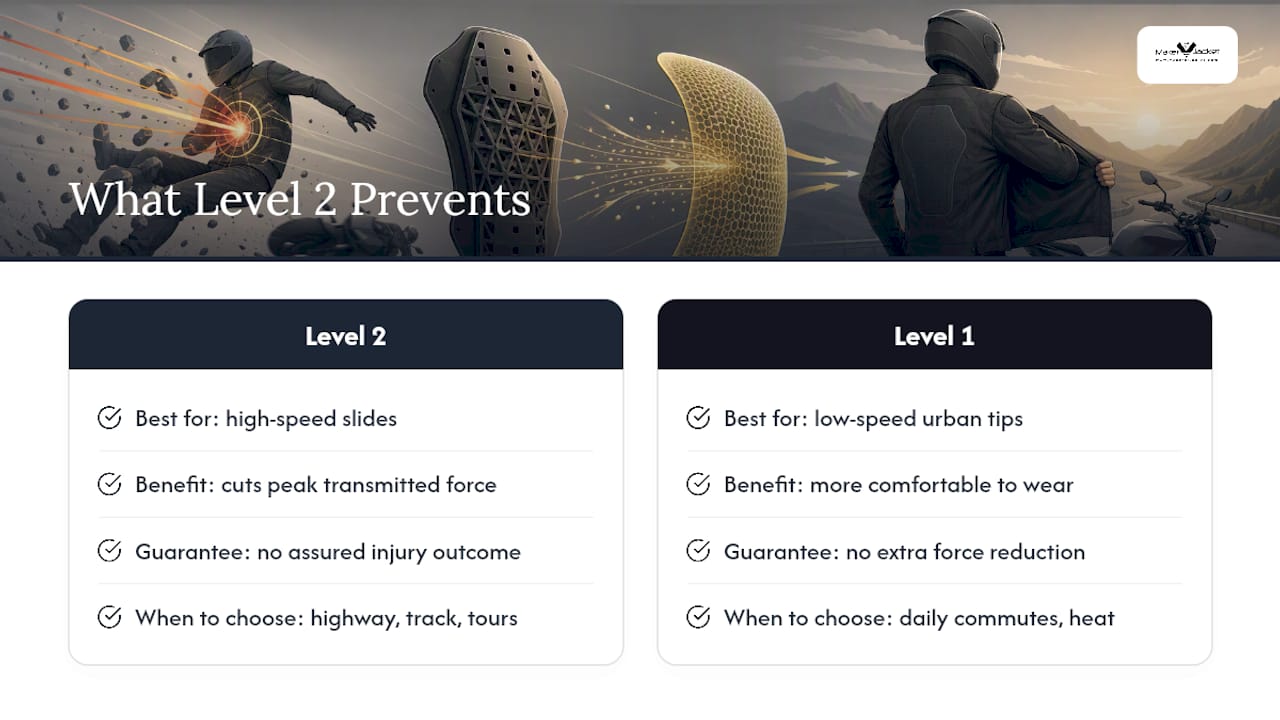
Lab numbers only matter if you know what they translate to on asphalt. Level 2’s biggest real-world payoff shows up in high-speed slides and compressive impacts to the spine, exactly the scenarios where lower transmitted force has the most room to change an outcome. Sliding off at 70 mph and taking a hit to the back is a fundamentally different event than a low-speed parking lot tip-over, and Level 2’s force reduction matters more as impact energy climbs.
What Level 2 doesn’t do is guarantee you walk away unhurt. Bone and soft tissue have their own failure thresholds, and a fracture can still happen even with force cut in half, particularly with an awkward impact angle or a hit concentrated on a small area. Certification tells you the armor reduces peak transmitted force under controlled lab conditions. It doesn’t promise a specific injury outcome in a real crash, which involves far more variables than a drop tower can simulate.
This is where comfort earns its place in the conversation. Rider-focused testing and field experience consistently point to the same conclusion: the best armor is the armor you actually wear every ride. A Level 1 protector worn consistently on every commute beats a Level 2 pad that’s too stiff or hot to bother with and ends up in a drawer. For slow urban riding with low average speeds, that comfort trade-off toward Level 1 is defensible. For highway stretches, multi-day tours, or anything with a helmet and leathers already on for track use, Level 2 is the harder-to-argue-against choice.
The Fit Checklist That Makes Certification Count
A Level 2 protector that shifts out of position during a crash isn’t giving you Level 2 protection anymore. Fit failures, where a pad rides up, twists, or slides off-center during dynamic movement, are a documented reason certified armor underperforms in real incidents. Certification measures the pad in a lab, not on a moving body, so the fit is entirely on you to get right.
Start with back coverage. Central back (CB) protectors cover the spine column itself, while full back (FB) protectors extend across the shoulder blades and lower back for broader coverage. If you can size up to full back without sacrificing mobility, it’s generally the stronger choice for touring and highway riding.
Run through this checklist before you commit to a purchase:
- Insert the protector into its pocket and move through a full range of motion, including reaching forward as if gripping handlebars.
- Check that the pocket depth holds the pad flush against your body without gaps at the edges.
- Confirm any keeper straps or elastic retention actually engage, not just sit loose.
- Sit on the bike in riding position and check the pad hasn’t shifted or ridden up.
- Verify the armor zone in the jacket lines up with your actual joint or spine position, since jacket sizing varies between brands.
Coverage on paper means nothing if the pocket is too shallow or the pad migrates the first time you lean into a turn. A jacket built with dedicated safety features and properly sized armor pockets solves most of this before you even get on the bike.
How to Verify CE Level 2 Before You Buy
Confirming a claim takes less time than reading a product description. Start with the label sewn or molded directly onto the protector, not the outer jacket tag, and look for the EN1621 code followed by a “2.” That number sequence is non-negotiable if you want documented Level 2 performance.
A few checks separate a legitimate claim from a marketing shortcut:
- Ask for test certification. Reputable manufacturers can produce a certificate number tied to that specific protector model, issued by an accredited test body.
- Check whether the insert is the certified item. Some jackets ship with generic foam pads while the certified insert is sold separately as an upgrade, so confirm the certificate matches the actual part number you’re receiving, not just the jacket model.
- Watch for a CE logo with no EN1621 reference anywhere. That’s the clearest red flag there is. A CE mark alone can indicate certification for an entirely different sport, like skiing or cycling, not motorcycle impacts.
- Be skeptical of vague language like “impact resistant” or “safety rated” with no standard number attached anywhere in the listing.
If a seller can’t answer a direct question about which EN1621 level their armor carries, that’s your answer. Move on.
Fitting CE Level 2 Armor Into Jackets, Pants, and Suits
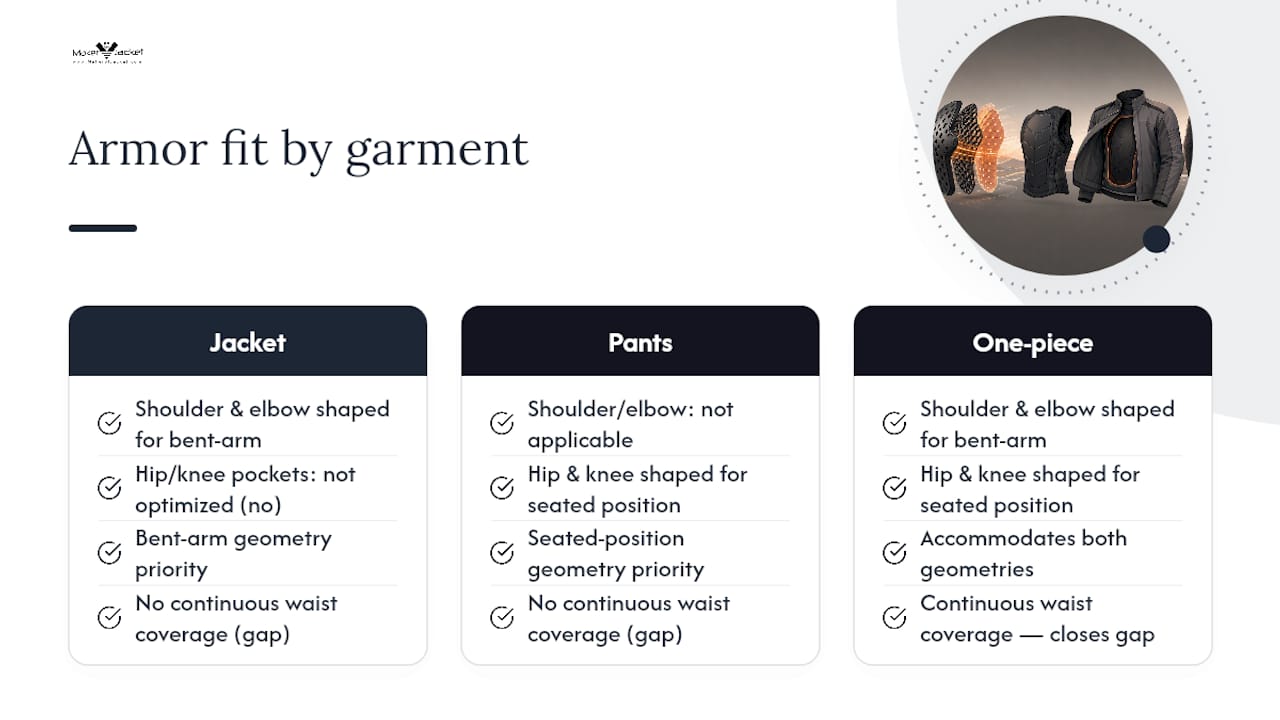
CE Level 2 inserts aren’t one-size-fits-all across garment types, and the pocket design varies more than most riders expect. A jacket’s shoulder and elbow pockets are shaped around bent-arm geometry, while pants pockets at the hip and knee need to accommodate a seated riding position without bunching. A one-piece suit has the advantage of connecting both zones with continuous coverage at the waist, closing a gap that separate jacket-and-pants combinations often leave exposed.
Back protectors deserve special attention here because they’re rarely garment-specific. A quality CB or FB back protector will usually transfer between a jacket and a separate back-protector vest, which matters if you own multiple jackets for different weather but only want to buy one high-quality back insert. Check that the pocket depth and retention system on each garment actually matches the protector’s shape before assuming compatibility.
Mixing brands between the insert and the outer garment is common and generally fine, as long as the pocket dimensions match. A layering strategy built around comfort and coverage also affects how well armor stays put, since a poorly layered base layer underneath can cause a well-fitted protector to shift during a long ride. If you’re building a full kit from separate pieces rather than a matched suit, prioritize consistent pocket sizing over brand matching.
Keeping Level 2 Armor Working Over Years of Riding
Impact materials degrade with heat, UV exposure, and repeated compression, even when the outer jacket still looks fine. Non-Newtonian compounds like D3O and SAS-TEC are engineered to resist this better than old foam, but “resist” doesn’t mean immune.
A few habits extend the working life of your protectors. Pull inserts out of pockets when you store the jacket for extended periods, since prolonged compression in a folded position can eventually affect how evenly the material responds to impact. Avoid leaving gear in a hot car trunk or direct sunlight for hours at a time, since sustained high heat is exactly the condition EN1621’s temperature ageing tests are designed to probe. Wipe protectors down with a damp cloth rather than tossing them in a washing machine, since detergent and agitation can break down the compound over repeated cycles.
Inspect inserts every season for cracking, permanent deformation, or a section that no longer flexes the way the rest of the pad does. If one corner feels stiffer or softer than the rest after a hard drop or a long hot summer, that’s a sign the material’s consistency has changed. Manufacturers don’t publish a universal expiration date for impact inserts, but a pad that’s taken a hard hit already or shows visible wear deserves replacement rather than a bet on continued performance. Proper leather care around the pockets themselves also matters, since a stretched or torn pocket seam is often what lets a perfectly good protector shift out of position.
Myths That Get Riders Hurt
The biggest misconception is that “Level 2” means twice as safe as Level 1. It doesn’t work as a clean multiplier. The lab thresholds show roughly half the transmitted force gets through, but injury outcomes depend on impact angle, speed, and body position in ways a drop-tower test can’t fully capture. Treat Level 2 as a meaningfully lower risk ceiling, not a guarantee.
Another common assumption: thicker automatically means better. Some of the best-performing modern inserts are thinner than decade-old foam-and-shell designs, because non-Newtonian compounds achieve their force reduction through material behavior, not sheer mass. Judge a pad by its EN1621 rating, not how bulky it feels in your hand.
Riders also frequently assume a CE logo on the jacket’s care tag certifies the armor inside. It doesn’t. The jacket and the insert are frequently certified separately, and some jackets ship with placeholder foam rather than the actual rated protector. And there’s a persistent belief that armor never wears out. Impact materials age with heat, compression, and time, and a pad that’s absorbed one real hit has already used up some of its designed performance, even if it looks unchanged from the outside.
How CE Level 2 Stacks Up Against Other Global Standards
EN1621 is the dominant framework for motorcycle armor sold in Europe and widely adopted by manufacturers selling globally, including in the United States, since most protective gear brands build to one standard rather than maintaining separate lines. American riders will occasionally see references to ASTM standards, which cover a broader range of protective equipment categories but don’t have a motorcycle-specific armor framework as detailed or as widely adopted as EN1621.
FIM, the international motorcycle racing federation, sets its own homologation requirements for competition gear, and those standards generally reference or build on EN1621 thresholds rather than replacing them with an entirely separate testing philosophy. In practice, this means a Level 2 rating under EN1621 is the reference point most manufacturers, race organizers, and safety-focused riders actually check, regardless of what country the gear is sold in.
The practical takeaway for anyone shopping in the United States: EN1621 is not a European-only standard riders can ignore. It’s the most detailed, widely tested framework available, and checking for it remains the most reliable way to compare armor claims across different brands and countries.
Maker of Jacket’s Perspective: Designing for Protection You’ll Wear
Most of what goes wrong with CE Level 2 armor has nothing to do with the insert itself. It’s the pocket. A pad rated for a 9 kN peak transfer does nothing for you if the jacket’s armor pocket is too shallow, too tight, or shaped for a different protector entirely. That’s the gap some manufacturers design around: building pockets sized generously enough to accept quality Level 2 inserts, and giving riders honest size guidance so a jacket ordered online fits the way it needs to on the bike, not just on a hanger.
Customization solves the fit problems that stock sizing can’t. If a rider needs a deeper shoulder pocket, a full-back option instead of central-back, or extra room through the torso to accommodate thicker viscoelastic pads, that’s a request some manufacturers can build around rather than a compromise you’re stuck with. Our guide to how armor integrates into jacket design walks through how that balance between structure and comfort actually gets built, and our jacket selection guide covers the fit fundamentals that make any certified insert worth wearing in the first place.
— Maker
Get a Jacket Built Around the Armor You Actually Chose
Most off-the-rack jackets force you to accept whatever armor pocket the manufacturer decided on, whether it fits your chosen Level 2 insert or not. Some manufacturers build custom jackets with pockets sized to your protectors and your body, not a generic template, so the pad you researched actually stays where it belongs when it matters.

Ordering starts with picking a base style, biker, touring, or a fitted leather jacket, then specifying armor pocket depth, back protector type, and sizing details through the customization request process. If you already own EN1621-rated inserts and just need a jacket that accommodates them properly, mention that directly during your order. Head to the custom jacket order page to start specifying your build, or browse personalized jacket options if you want to see what customization looks like before committing to specs.


