How to Lengthen Jacket Sleeves for a Perfect Fit
Getting the sleeve length right on a jacket can make or break the whole look. Most people assume you need a tailor and complicated equipment just to fix a sleeve. But the truth is, with a flexible tape and the right method, you can nail a professional result at home—even a single stitch out of place can leave sleeves noticeably uneven. The real surprise is how a few simple steps give you perfect sleeves and save you a trip to the tailor.
Table of Contents
- Step 1: Measure Your Sleeve Length Accurately
- Step 2: Choose Your Lengthening Method
- Step 3: Prepare Your Tools And Materials
- Step 4: Execute The Sleeve Lengthening Process
- Step 5: Verify The Fit And Make Adjustments
Quick Summary
| Key Point | Explanation |
|---|---|
| 1. Measure sleeve length accurately | Use a flexible measuring tape for precision, measuring from the back of the neck to the wrist bone or beyond for personal preference. |
| 2. Choose the right lengthening method | Select an appropriate technique based on fabric type; consider your skill level to achieve a seamless result. |
| 3. Prepare tools and materials beforehand | Gather specialized tools and matching materials to facilitate a professional-looking sleeve extension. |
| 4. Execute with precision and care | Mark the extension line carefully, and use suitable sewing techniques to maintain the jacket’s original aesthetics. |
| 5. Verify the fit post-alteration | Try on the jacket to ensure comfort and appearance; make minor adjustments for a polished finish if needed. |
Step 1: Measure Your Sleeve Length Accurately
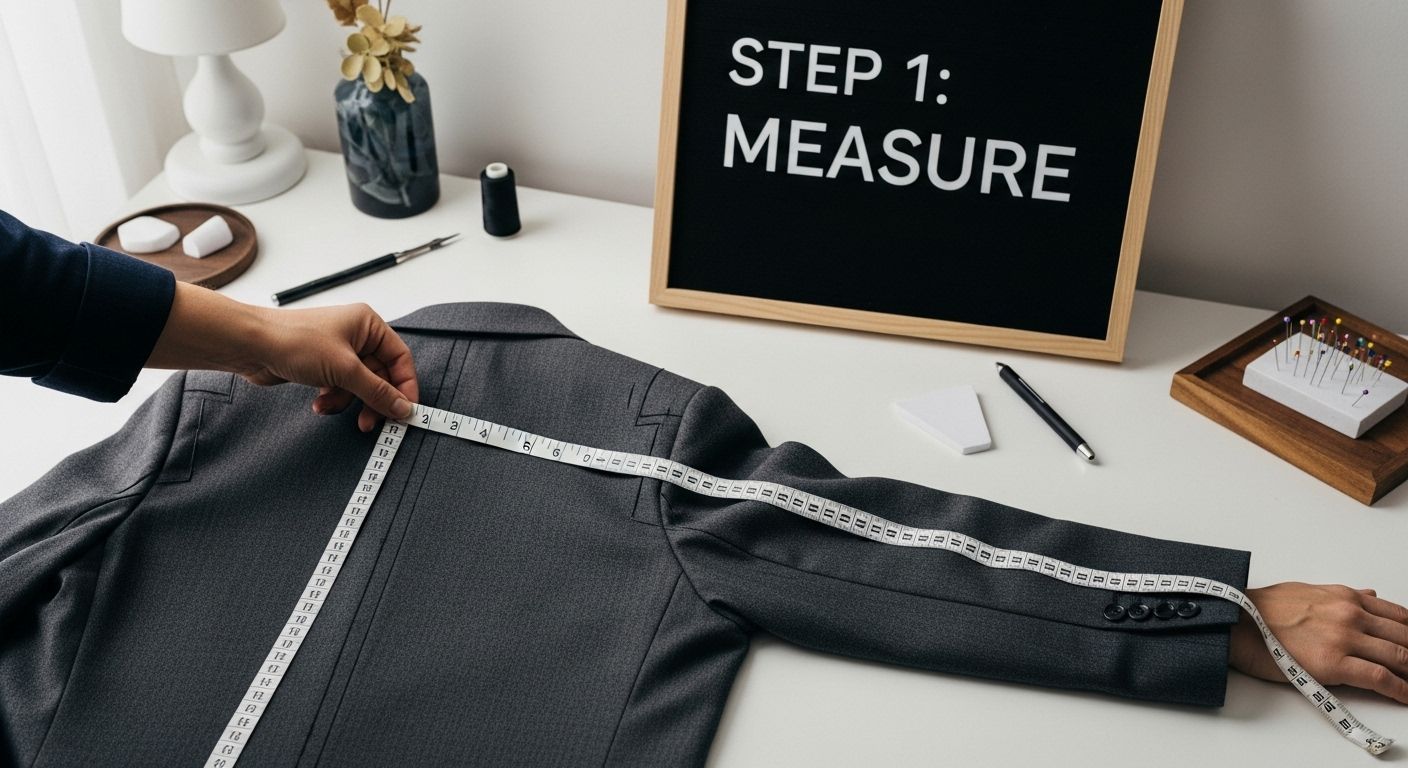
Accurately measuring sleeve length is the critical first step in understanding how to lengthen jacket sleeves effectively. Your goal is to obtain precise measurements that will guide the entire alteration process and ensure a perfect fit. Without accurate measurements, subsequent modifications might result in ill-fitting or awkward sleeve extensions.
To begin, you will need a flexible cloth measuring tape, which provides the most accurate and comfortable measurement method. Stand in a relaxed posture with your arms hanging naturally at your sides. Start by positioning the measuring tape at the center back of your neck, where the spine meets the collar. Carefully run the tape over the top of your shoulder, down the outside of your arm, past the elbow, and continue until you reach the desired sleeve length. Pro tip: Most tailors recommend measuring to the wrist bone or slightly beyond, depending on your personal preference for sleeve length.
When taking measurements, maintain a few key considerations. First, wear the type of shirt or base layer you typically wear underneath the jacket to ensure the most realistic measurement. Keep the measuring tape slightly loose – not tight against the skin, but not hanging freely. Make certain you’re standing straight but not rigidly, as this can distort the natural hang of the sleeve. Take multiple measurements to confirm accuracy, recording each one to compare and validate your results.
For those working alone, using a full-length mirror can help ensure you’re positioning the tape correctly. If possible, ask a friend or family member to assist you, as they can provide a more precise measurement from a different perspective. Check out our sizing guide for additional tips on obtaining the most accurate sleeve measurements.
Once you have your measurement, write it down immediately and double-check the number. A precise sleeve length measurement is your foundation for successfully lengthening jacket sleeves, so take your time and be meticulous in this initial step.
Step 2: Choose Your Lengthening Method
Choosing the right method to lengthen jacket sleeves is a critical decision that depends on your jacket’s material, construction, and your personal skill level. Different approaches suit different jackets, and understanding these methods will help you achieve a professional and seamless result. The goal is to extend your sleeve length while maintaining the jacket’s original aesthetic and structural integrity.
For leather jackets, which require specialized techniques, you have three primary approaches. The first method involves adding a complementary fabric panel at the sleeve’s lower edge. This technique works best with jackets that have minimal decorative elements or complex sleeve designs. You will need to select a fabric that closely matches the jacket’s texture and color, ensuring the added panel blends seamlessly. Precision is key – the added panel must be cut with extreme accuracy to maintain a clean, professional appearance.
A second method involves removing the existing sleeve cuff and adding extra length directly to the sleeve’s bottom. This approach requires more advanced sewing skills and works exceptionally well with straight or slightly tapered sleeves. You will need to carefully unpick the original cuff, add your fabric extension, and then reattach the cuff with meticulous stitching. Explore our detailed sizing guide to understand how sleeve modifications impact overall jacket fit.
The third technique, which is more complex, involves adjusting the sleeve at the shoulder point. This method requires significant tailoring expertise and is recommended only for those with advanced sewing skills or professional tailoring experience. By reconstructing the sleeve’s upper portion, you can effectively add length while preserving the jacket’s original shoulder line and overall silhouette. This approach is particularly useful for structured jackets with intricate shoulder constructions.
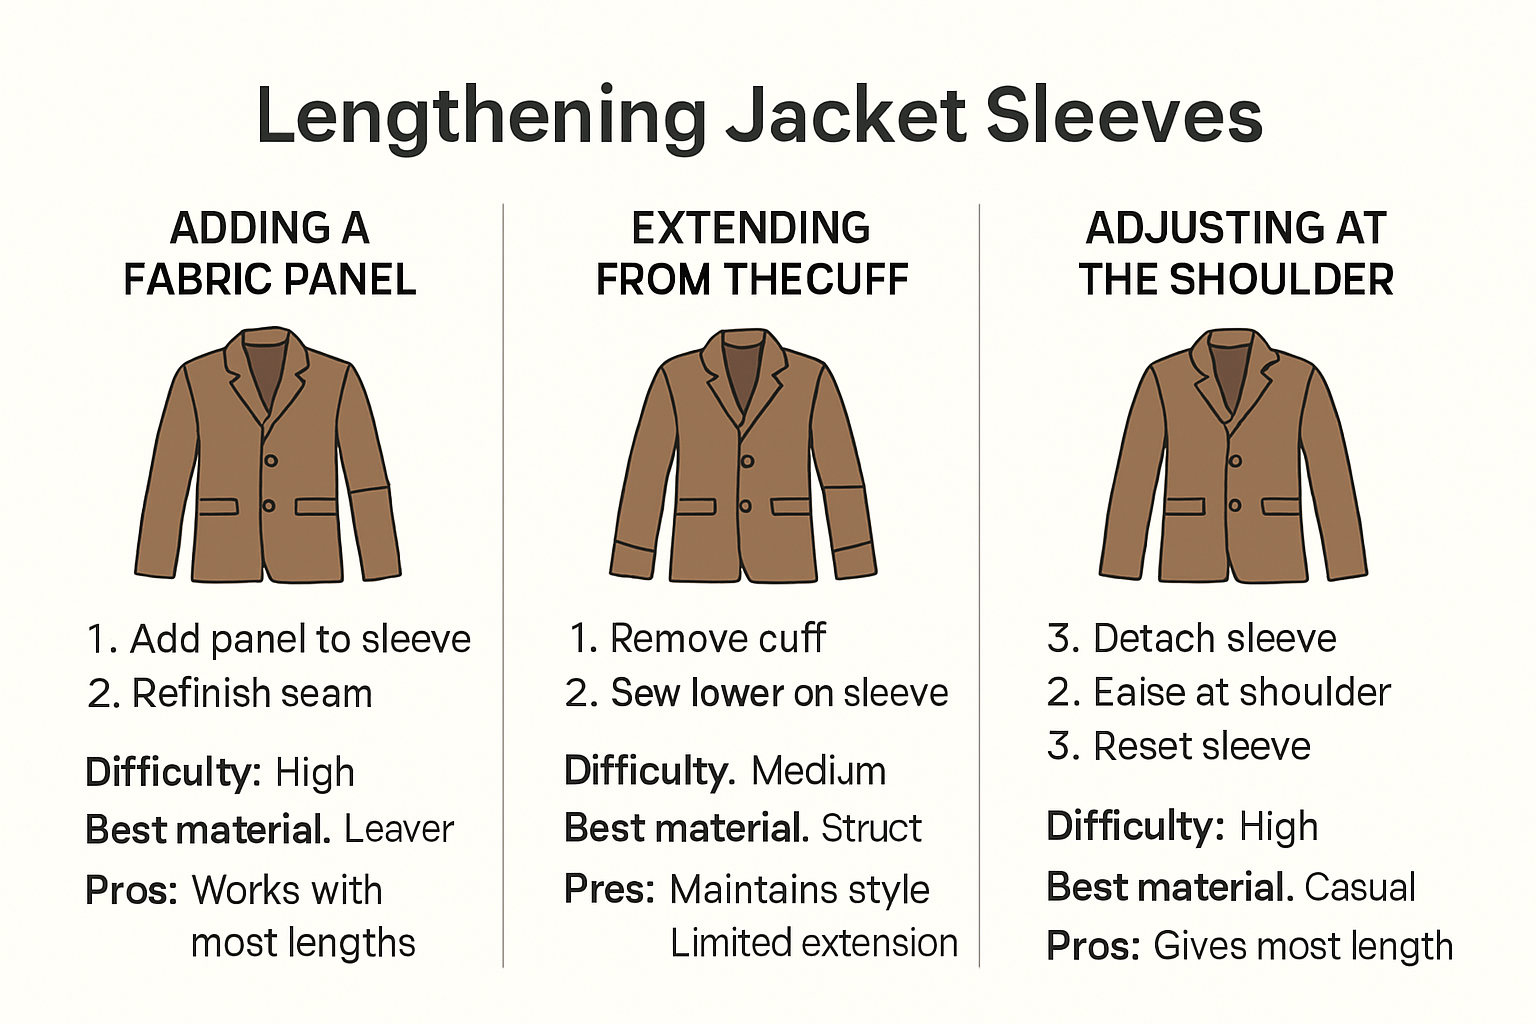
Before selecting your method, carefully examine your jacket’s material, construction, and current sleeve details. Consider your personal skill level honestly – if you are uncertain about executing the modification, consulting a professional tailor might be the most prudent choice. Each method carries its own set of challenges and requires different tools and techniques, so choose the approach that best matches your capabilities and the specific characteristics of your jacket.
Here is a comparison of common methods for lengthening jacket sleeves, with details about when each technique is most appropriate and the skill level required.
| Method | Suitable For | Description | Skill Level |
|---|---|---|---|
| Adding Fabric Panel | Simple jackets, minimal design | Attach a matching fabric/leather panel to sleeve end for extra length | Beginner |
| Removing Cuff & Extending Sleeve | Straight or slightly tapered sleeves | Remove existing cuff, sew extension to sleeve, and reattach cuff | Intermediate |
| Adjusting at Shoulder | Structured or tailored jackets | Modify sleeve at shoulder seam to increase length, preserving shoulder & silhouette | Advanced |
Step 3: Prepare Your Tools and Materials
Preparing the right tools and materials is crucial for successfully lengthening jacket sleeves. This preparatory stage can make the difference between a professional-looking modification and a disappointing result. Gathering your supplies beforehand ensures a smooth, efficient process and helps prevent interruptions once you begin working.
For leather jackets, you will need specialized tools that differ from standard fabric alteration equipment. Essential tools include a sharp rotary cutter or leather scissors, which provide clean and precise cuts without damaging the material’s delicate surface. Invest in high-quality leather needles for your sewing machine, as standard needles will tear or shred leather instead of creating clean punctures. You will also require leather-specific thread, which is stronger and more durable than regular sewing thread. Explore our sizing guide to understand how precise measurements impact your tool selection.
Beyond cutting and sewing tools, you will need supplementary materials to ensure a clean and professional sleeve extension. Select a matching leather or fabric panel that closely resembles your jacket’s original material in color, texture, and weight. Interfacing becomes critical for reinforcing seams and maintaining the jacket’s structural integrity. Choose a medium-weight fusible interfacing that provides support without adding unnecessary bulk. Specialized leather adhesive or fabric glue can help secure edges and prevent fraying, particularly in areas where traditional stitching might compromise the jacket’s appearance.
Your workspace setup is equally important. Create a clean, well-lit area with a large flat surface like a sturdy cutting table or smooth workbench. Protect your work surface with a self-healing cutting mat to prevent damage when using rotary cutters or scissors. Keep additional tools within reach: sharp fabric scissors, measuring tape, chalk or fabric marking pencils, pins with glass heads (which won’t melt under ironing), and a steam iron for pressing seams. Having a good iron with adjustable temperature settings is crucial for creating crisp, professional-looking alterations.
To help you prepare for lengthening jacket sleeves, the table below summarizes essential tools and materials needed, along with their intended uses and any tips for optimal results.
| Tool/Material | Purpose | Notes / Tips |
|---|---|---|
| Flexible Tape Measure | Accurate measurement of sleeve length | Prefer cloth for best accuracy |
| Leather Scissors/Rotary Cutter | Cutting leather or fabric panels | High-quality blades prevent damage |
| Leather Needles | Sewing leather material | Use with sewing machine for clean results |
| Leather Thread | Durable stitching for leather | Stronger than regular sewing thread |
| Matching Panel/Material | Sleeve extension | Match original color, texture, and weight |
| Fusible Interfacing | Seam and structure reinforcement | Medium-weight is ideal |
| Leather Adhesive/Fabric Glue | Securing edges, preventing fraying | Helpful for leather where pins aren’t used |
| Fabric Chalk/Marking Pencil | Marking extension lines | Choose removable marks |
| Steam Iron | Pressing seams for clean finish | Adjustable temp. prevents damage |
Before starting, lay out all your tools and materials, ensuring everything is clean, sharp, and readily accessible. Double-check that you have matching thread, appropriate needles, and backup supplies. This methodical preparation will set the stage for a successful sleeve lengthening project and help you avoid frustrating interruptions midway through the process.
Step 4: Execute the Sleeve Lengthening Process
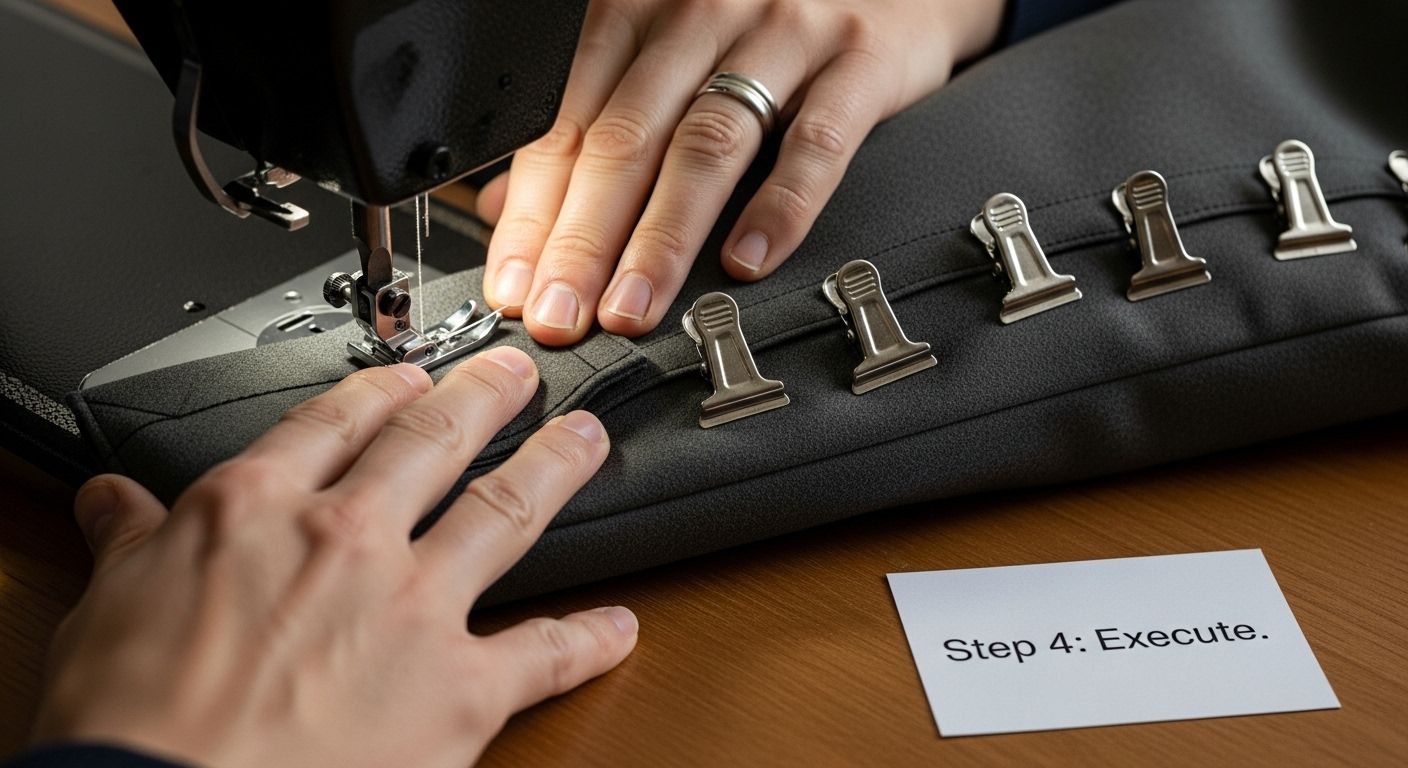
Executing the sleeve lengthening process requires precision, patience, and careful attention to detail. This critical stage transforms your preparation and measurements into a tangible modification that will improve your jacket’s fit. Your success depends on methodical execution and maintaining the jacket’s original aesthetic and structural integrity.
Begin by carefully marking your intended extension line on the sleeve using fabric chalk or a removable marking tool. Precision is paramount – even a slight deviation can result in an uneven or awkward sleeve appearance. If you are adding a fabric panel, position it carefully, ensuring the grain and texture align perfectly with the original sleeve material. For leather jackets, use specialized leather clips instead of traditional pins to hold the extension in place, as pins can leave permanent puncture marks.
The actual attachment process varies depending on your chosen method. When adding a fabric panel, you will need to create a nearly invisible seam that blends seamlessly with the original sleeve. This requires extremely careful stitching, typically using a walking foot on your sewing machine to ensure even fabric movement. For leather jackets, you might need to use a leather adhesive in conjunction with specialized stitching to create a durable and aesthetically pleasing extension. Consult our sizing guide for additional insights on achieving the perfect sleeve fit.
As you work, frequently stop and check your progress, comparing the modified sleeve against your original measurements. Use a steam iron set to the appropriate temperature for your jacket’s material to press seams flat, creating a crisp, professional finish. Pay special attention to maintaining the sleeve’s original shape and structure. If you are working with a leather jacket, use a teflon presser foot and adjust your iron’s temperature carefully to avoid damaging the material.
Once the extension is complete, try on the jacket and move your arms through various positions to test the new sleeve length and ensure comfortable mobility. Check for any puckering, uneven lines, or areas where the extension looks visibly different from the original sleeve. Minor adjustments might be necessary to achieve a truly seamless modification. The goal is not just added length, but a transformation that looks intentional and professional, as if the jacket was originally designed with this precise sleeve length.
Step 5: Verify the Fit and Make Adjustments
Verifying the fit of your newly lengthened jacket sleeves is the most crucial step in ensuring a professional and comfortable modification. This final stage requires careful examination and potentially subtle adjustments to achieve the perfect sleeve length and overall jacket silhouette. Your goal is to create a seamless alteration that looks intentional and natural.
Begin by trying on the jacket in front of a full-length mirror, wearing the type of clothing you typically layer underneath. Movement is key – perform a series of arm movements to test the sleeve’s range of motion and comfort. Raise your arms, reach forward, and rotate your shoulders to ensure the extended sleeves do not restrict your movement or create unwanted bunching. Pay close attention to how the sleeves sit when your arms are at rest and during different positions. Explore our detailed sizing guide for additional insights into proper jacket fit.
Critical observation points include checking the sleeve’s hang and alignment at the shoulder. Look for any signs of pulling, twisting, or uneven fabric distribution. The sleeve should fall smoothly from the shoulder without creating diagonal lines or awkward folds. If you notice any slight imperfections, you may need to make minor adjustments. This might involve carefully trimming excess fabric, re-pressing seams, or making small realignments to achieve a more polished appearance.
Consider taking photographs of yourself from multiple angles to get an objective view of the modification. Sometimes, visual documentation reveals subtle issues that are not immediately apparent in a mirror. Compare the modified sleeves side by side, ensuring they are symmetrical in length and appearance. If you detect any discrepancies, mark the areas that need adjustment with fabric chalk or removable markers.
The final test involves wearing the jacket for an extended period. Sit, stand, and move around to ensure the modified sleeves maintain their position and comfort. Pay attention to any potential irritation points or areas where the extension might feel slightly different from the original sleeve. Minor refinements at this stage can prevent future discomfort and ensure your jacket modification meets your expectations of both style and functionality. Remember, a perfect sleeve extension should feel so natural that it goes unnoticed – the hallmark of a truly successful alteration.
The following checklist table helps you verify that your sleeves fit perfectly after lengthening and identifies important aspects to examine during the final assessment.
| Step | What to Check | How to Confirm |
|---|---|---|
| Try on jacket | Overall sleeve length and comfort | Sleeves reach desired point; no restriction |
| Move arms/rotate shoulders | Range of motion and potential bunching | No tightness or excess fabric movement |
| Mirror check (all angles) | Sleeve alignment and hang | Sleeves fall smoothly, symmetrical |
| Examine shoulder area | Pulling, twisting, or unevenness | Seams align, no diagonal lines or folds |
| Photograph review | Subtle visual discrepancies | Sleeves appear even in photos |
| Compare both sleeves | Symmetry in length and look | Same length/appearance side-by-side |
| Wear for extended period | Comfort and appearance while moving | No irritation, sleeves stay in place |
Take the Guesswork Out of Perfect Sleeve Length
Struggling with sleeves that just do not measure up? If you have spent time following step-by-step advice on how to lengthen jacket sleeves for a perfect fit, you already know how tricky it is to get that seamless look and comfortable feel. No more frustration with uneven cuffs, mismatched panels, or the stress of modification gone wrong! At Maker of Jacket’s collection, you will find expertly crafted jackets in a wide range of styles and fits designed for your exact needs. Whether you love a classic biker, trendy varsity, or unique custom look, you have access to professional craftsmanship, quality materials, and reliable sizing—all in one place.

Why settle for DIY fixes if you can upgrade your wardrobe with precision-made jackets that guarantee comfort and style? Browse Maker of Jacket’s collection for high-quality options or start your journey on our main site. Order now and experience the difference that true fit and customization make. Your perfect jacket is waiting—discover it today and ditch alteration anxiety for good!
Frequently Asked Questions
How do I measure sleeve length accurately for my jacket?
To measure sleeve length accurately, use a flexible cloth measuring tape and stand with your arms relaxed at your sides. Measure from the center back of your neck over the top of your shoulder, down the outside of your arm, to your desired sleeve length, typically to the wrist bone or slightly beyond.
What methods can I use to lengthen my jacket sleeves?
There are several methods to lengthen jacket sleeves, including adding a fabric panel, removing the existing cuff and extending the sleeve, or adjusting the sleeve at the shoulder. The best method depends on the jacket material, construction, and your sewing skills.
What tools and materials do I need to lengthen sleeve lengths on a leather jacket?
For leather jackets, you’ll need leather scissors or a rotary cutter, leather needles, durable leather-specific thread, interfacing, and potentially leather adhesive. Additionally, make sure to have fabric marking tools, pins, and a steam iron handy for pressing seams.
How can I verify the fit after lengthening my jacket sleeves?
To verify the fit, try on the jacket while wearing the clothing you’ll layer beneath it. Perform various arm movements to ensure comfort and mobility, checking for proper alignment and hang of the sleeves. Look for any twisting or bunching, and make adjustments as necessary.
